Here are couple of 3D Wayfinder template examples. Wayfinding template for touch screen kiosks and mobile for indoor positioning in shopping malls, hospitals, airport etc. Contact our sales team for demo.


Here are couple of 3D Wayfinder template examples. Wayfinding template for touch screen kiosks and mobile for indoor positioning in shopping malls, hospitals, airport etc. Contact our sales team for demo.
We have joined the Open Design Alliance to develop CAD file support to 3D Wayfinder. With CAD support it will be easy to upload building drawing files and show them directly through web.
3D Technologies R&D (developer of 3D Wayfinder) is now a member of Open Design Alliance. The Open Design Alliance (ODA) is a nonprofit organization dedicated to the promotion of open industry-standard formats for CAD. ODA was established in 1998 and now has over 1300 members.
Most of the architectural modelling is done with Autodesk CAD software packages, where DWG files are native file formats. DWG is a proprietary and closed file format and it doesn’t have open specifications. ODA has deigned Teigha library which supports the use of C++, .NET, and ActiveX interfaces. Also it allows the exchange of data through .dwg, .dgn and .stl files.
We will search the possibilities to provide also DWG file reading in 3D Wayfinder. This will open up a whole new area for 3D Wayfinder. Architects can directly upload their building drawing to 3D Wayfinder and also real estate managers, building owners etc. For example DWG files that can be viewed through 3D Wayfinder. There will be no need for converting DWG-s to common 3D formats that 3D Wayfinder currently supports.
Currently we are developing features to insert external 3D models to floor plans. With this it would be possible to add these “little details” (like escalators, benches, trees or even cars). That make the floor-plans look realistic. The best thing is, that it doesn’t require any 3D modelling skills. So all our users can detail the floor plans by themselves.
3D object library can be opened in Editor window with object thumbnails:
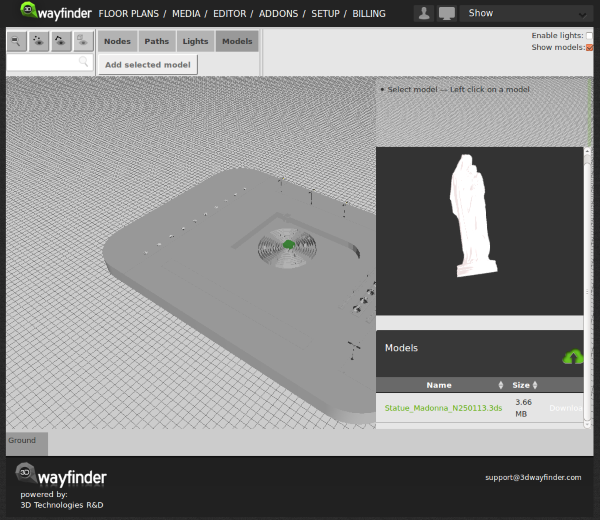
Added objects appear on the 3D scene. The good part here is, that the same model can be used inside the scene many times. Therefore it doesn’t increase the downloadable model sizes as each model will be loaded only once.

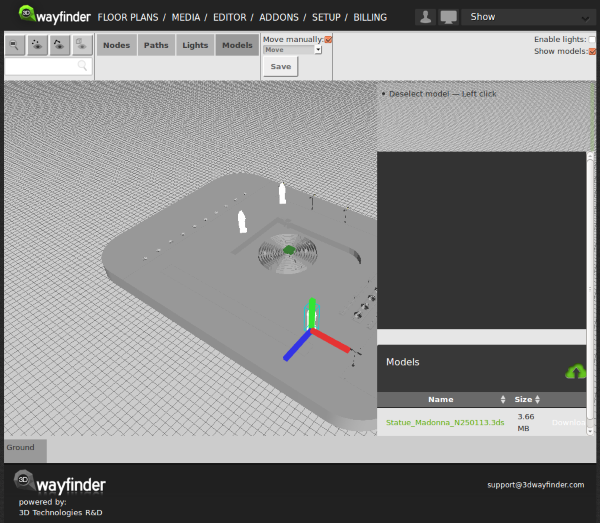
3D models to floor plans can be resized and moved inside the 3D Wayfinder.
With external 3D models. We will definitely provide common library of models we are using to detail the floor plans. For example these will include trees, cars, different indoor plants, escalators, tables, stairs and so on. See our user manual.
Some of our customers prefer a “Welcome” screen for their wayfinding application. Welcome screens are good way for inviting visitors to use wayfinding, it is also a page where you can show advertisements or welcome text. To minimize the load for kiosks we change the frame-rate of our WebGL rendering engine FRAK.

Welcome page is configur as an idle-page, when no one is using wayfinding. Usually it is set to 10+ seconds after idle time, when the welcome screen is displayed. On this view, we are hiding wayfinder map component and directory. When visitor starts to use wayfinding, then welcome screen close and floor plans with directory are activate. Certainly, the welcome screen is also helpful for customers to understand what the screen is about. Also a great way to advertise for businesses located in the mall.
To save the kiosk pc and graphics card (GPU) we set the 3D rendering (see FRAK WebGL engine) also idle. This is important for limiting the frame-rate to a minimum. Frame rate change can be invoke with Engine.startIdle(fps) and return to normal operation with Engine.stopIdle(). See 3D Wayfinder API for specific documentation.
We have also fixed a bug in SmoothOrbitController that made animations oscillate on very low frame rates.
Thanks to implemented deferred renderer it is possible to create and manage lights on 3D Wayfinder Administration panel. This means also real-time shadows, point-lights and multiple directional lights.
Deferred rendering is an alternative approach to rendering 3d scenes. The classic rendering approach involves rendering each object and applying lighting passes to it. So, if an object is affected by 5 lights, it will be rendered 5 times, once for each light, in order to accumulate the effect of each light. This approach is called “forward rendering”.
Deferred rendering takes another approach: first of all of the objects render their “lighting related infomation” to a texture (G-buffer). This includes their colors, normals, depths and any other info that might be relevant to calculating their final color. Afterwards, the lights in the scene are rendered as geometry (sphere for point light, cone for spotlight and full screen quad for directional light), and they use the G-buffer to calculate the color contribution of that light to that pixel.
Using deferred renderer decreases performance a bit, but with proper GPU, the frame rate drops only by 1-2 frames per second.
Lights can be added and managed from „Lights” tab in editor window.

There are 3 types of light:
So lets get started with adding lights and see, what will happen in our 3D scene.
First we have turned on deferred renderer. With default settings, it is currently not turned on.

To use custom lighting model on Wayfinder application side, we have to enable deferred renderer.
Now we can see shadows:

Now we have added 2 point-lights. From the settings we have selected „Omnidirectional” and by playing with radius and intensity we get the desired result. One of the lights is white and another one yellow:

At the same time we have lost the default ambient color. So now everything looks a bit too colorful. To get the ambient color back, we added one ambient type light.
So far we used default ambient color, which is gray.
It doesn’t matter for ambient and directional light, where they are positioned in the 3D floor plan. For clarity and easier management we have made them same kind of „cubics” as omnidirectional light. So you can position them wherever you like.
After adding gray ambient color, we get this:

Now lets add a custom directional light. Lets say that we prefer shadows in other direction and this front-side of the building to be more lightened.
With directional light it is important to turn the direction of the light. For this we need to check „move manually” and then select rotate.

After saving we see a picture with different shadows:

Well, the shadows are really long and the whole scene looks a bit dark.
But we can always add another directional light. Of course adding each directional light, affects the performance, as for every light there will also be shadows rendered.
So go ahead and test the magical world of lights in 3D.