Blender Modeling Tutorial

May 28, 2022

How are 3D map models made in Blender? Here is a step by step look. You find detailed blender modeling tutorial with videos and specific guidelines.

BLENDER MODELING TUTORIAL GENERAL GUIDELINES

Maintain a clean quad topology and keep poly count low, no need for edge beveling and subdivisions, when the situation does not require it.

The floor, outer walls, inner walls, details, locations, stairs, elevators, locations and greyed out areas must be separate objects, please do not combine them into one.

Its also recommended to group objects of the same kind and name them accordingly.

1. SETTING UP THE SCENE AND MODELLING REFERENCE

Before starting the model make sure you have references ready.

Create JPEG or PNG files from the reference DWG’s or pdf’s.

If the buildings have multiple floors, make sure that the images have the same dimensions and the floors align with each other.

1.1 SETTING UP THE SCENE

Start by setting up the folder system for the project and adding the reference images into this folder system, then prepare the scene for modelling by setting the units( make sure units are consistent throughout the project). We use SI units( metric units), usually meters.

Now you can either create the basemap itself first, based on the provided references or you can create a simple rough layout for the building placement and replace it with a basemap later, based on the provided DWG and pdf references. For following examples, I took the rough layout route. Make sure the rough layout texture has dimensions relative to the upcoming basemap and is placement is roughly the same as it is intended to be intended to be on the basemap.

Add a plane into the scene and make sure it is at center of the scene. I usually scale it larger, for the sole reason of dealing with numbers with less decimal spaces. It can be made larger by either adjusting measurements, scaling in object mode( after which I apply the scale for a clean model), or scale in edit mode.

Now apply material and name it basemap and apply either the ready made basemap or the rough layout texture.

From top view, add floor reference image as an reference image, and align it to the rough layout texture and hide the basemap from view.

2. STARTING THE MODEL

Start by creating the floor plane, begin with the area that is not aligned straight, rotate the plane in object mode, by doing so, there will be a local transform embedded into the object, it will make things easier later on (Do not extrude it thicker, if the z fighting makes it necessary that it can be done later, when the modelling is complete, the reason being that all cutting and editing operations are easier to do with a plane ), name it.

Select the border edge, extrude it, separate it into a new object, name it outer wall or (OW), clear out subdivisions for a lighter model.

Add solidify modifier( No need to apply it), and make sure the direction of thickness goes outward and even thickness is checked.

3. CREATING INNER WALLS

Select Outer wall, duplicate a face, and separate it into a new object, name it Inner wall or IW.

Adjust the modifier settings and object height for variety within the model (optional).

From top view and transparency on, select the vertices and extrude them to create corners.

For visibility, you can select edges and mark them sharp.

NB! Make sure that corner combines only two faces, for the solidify modifier to work smoothly.

Duplicate faces in edit mode for additional walls.

Make sure the walls align properly, by using snap settings and limiting transforms to global or local axis.

Make sure the solidify modifier thickness direction is consistent, change face normals (Alt+N) if not.

4. ORGANIZING SCENE

Create a new collection and name it Floor_0 or something of similar nature.

Select basemap mesh, outer wall, floor mesh, and inner walls and add them to the collection by manually dragging them there in the outliner, or by pressing M in the active view.

Create a new collection and name it reference, add reference image into that collection.

5. MAKING DOORS AND OPENINGS

Select the object (Inner wall or outer wall) and in edit mode use loop cut (Ctrl+R) to divide polygon where necessary, and use edge slide or regular transforming to move it to the right place.

Delete the polygon from between said edges.

With solidify modifier active and not applied, the new door opening will not affect the thickness of wall.

6. STAIRS AND ELEVATORS

No limitations besides low poly count.

Easiest way to populate the scene with stairs, elevators and escalators in to finalize one and then duplicate it.

Therefore make sure that the model is to your liking, it has material applied and when using textures, make sure the object has UV’s.

Add a collection into the floor_0 master collection and name it accordingly (stairs, elevators, escalators).

Make sure the object is within the collection, then duplicate it in object mode, use reference to place them.

7. NEW FLOOR

In the outliner, right click on the floor_0 collection and duplicate it, rename the duplicate into Floor_1 and for clarity I recommend to rename other collection within that as well.

In the outliner right click on the duplicated collection and select hierarchy.

Move it up on the z- axis so that the new floor sits directly atop the lower floor. It can be done either by constraining movement on the z axis and using snap settings, or by constraining movement to z axis and inputting the height of the object „Outer wall“( if you do not remember it then select the outer wall on the floor_0, go to edit mode and for example select one of the upper horizontal edges. Press N and look for the global position of the z axis).

Toggle of the visibility of floor_0 collection in the outliner and select the reference plane, select its object data properties panel and change the reference image from floor_0 to floor_1, if you set up the folders properly than the image should be in the same place.

Make the necessary changes and rebuild what must be rebuilt.

For example cutting in the openings for stairs and escalators etc. If quad topology was maintained then loop cuts work well.

Repeat for other floors.

8. EXPORTING

If the scene is organized then everything should be in right collections.

In the outliner, right click on the floor master collection (floor_0, floor_1…) and select hierarchy.

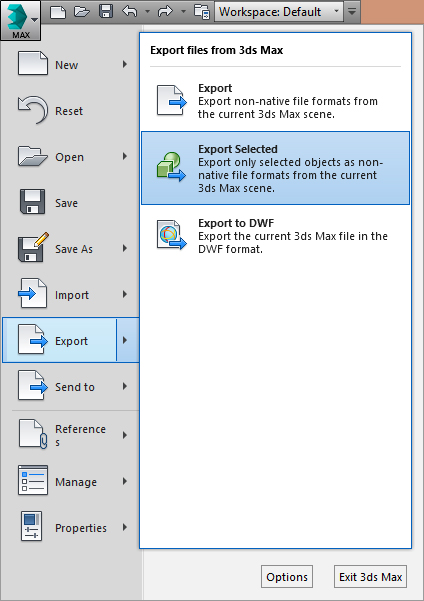
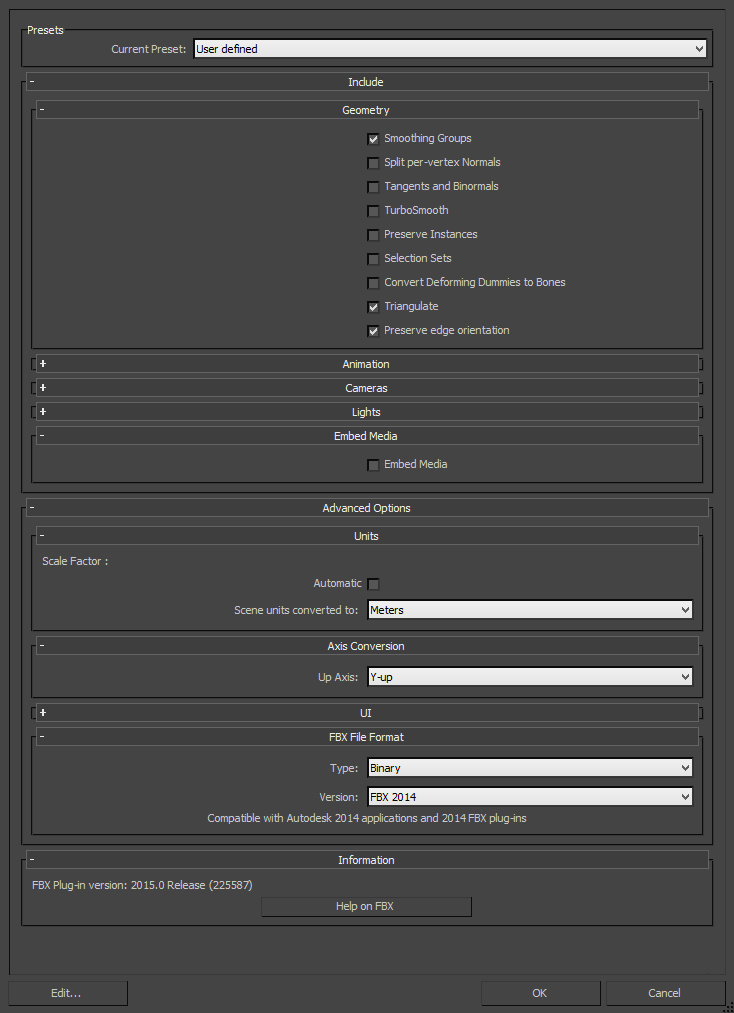
With the selection active, go to „file“, „export“ and then choose FBX format.

Check the box on „Selected objects“ and change scale value to 0.1.

Create a new folder into the folder system, name it export and add the date of export into the name. Whenever changes are made, create a new folder for the exported files.

Name the file and repeat with other floors.

When its necessary to share the whole project, pack all external data into the blender file from „File“, „External Data“.

Then zip and send the master folder of the whole project.

9. CREATING UV’S WITH MATCHED SCALE

Select floor meshes from all floor collections and isolate them with Shft+H (Alt+H to make everything visible again).

With active selection go to edit mode and make sure all faces are selected.

Open up UV editor split view and in 3D viewport go to top view.

With the selection active, press U while in viewport and select „project from view“.

Select and scale the UV’s if necessary.

In case textures need to be custom made in a another software, select one floor mesh, go to edit mode and select the faces in UV editor and export out the UV layout, it can be used for precise texturing. Repeat with other floors.

10. CLEANUP

Add a large cube to the scene and make sure it is in the overall scene collection, not in one of the floor collections.

Make sure all collections and objects are visible.

Select the cube and assign one of the dud duplicate materials to it.

With the cube selected, press Shft+L and select material, that selects all all objects with that material on it, press Shft+H to isolate selection.

Now apply the correct material to the cube.

Select all the objects with the dud duplicate material and then add cube to the selection, press Ctrl+L and select material. The last object in selection determines the material.

Number of material channels and their order is of importance in that operation. If objects with dud duplicates have multiple material channels and Cube has only one, then it changes only the first channel of the objects, if the cube has two then it changes two channels in the same order. Therefore if every object has only one channel, then it works smoothly, but if there are multiple channels and the dud duplicates are not in the same order then it requires some further steps- But in this case it is easier to change the dud duplicates manually on each object, after the selection step (step 4 of this tutorial).

When the changes are made, delete the cube.

On the top ribbon of outliner, navigate to „Orphan data“ and then click Purge.

Now duplicates have been removed from the scene.

As always we are pleased to help you for creating a wayfinding solution for you or your customer. If you like us to make the maps, please also look our floorplan campaign and don’t hesitate to contact us.

« »

Keeping Floor Plan Editor Idle in the Background

August 1, 2017

The new 3D Wayfinder Administration Panel is centered more around the floor plan editor. To provide better usability we keep the 3D editor idle when moving away to other pages. So switching between editor and other views is much faster now.

The new Administration Panel has been publicly available for testing since the beginning of this year. At the end of the summer we will only support the new administration panel. Although the current administration environment will be available for some time.

Loading the 3D floor plan editor takes a couple of seconds because we need to load 3D floor-plans models and also additional editor tools. Now when the editor is always in the background. We do not need to load the 3D editor again. This makes the usage more faster and user friendly.

new 3D floorplan editor

Our new administrator panel is being built on Angularjs. To achieve loading of editor once we have created the service that holds the canvas element. It is also attached our editor API to it. Controller then adds canvas to the editor view and provides connection to API actions.

To see and test new Administration panel and floor plan editor, please log in here. If you don’t have an account with 3D Wayfinder, you can create it here for free.

« »

Exporting 3D Models From 3ds MAX

February 5, 2016

3ds Max models cannot be used directly in 3D Wayfinder, as .max format is closed file format and our importer doesn’t support it. But exporting 3D models from Max is not complicated.

3D Wayfinder supports following formats for 3D models: .fbx, .dae, .lwo, .obj and .3ds. But as we are using ASSIMP for model converting it is possible to try also other formats. With 3ds Max, we recommend to use  .fbx or .dae formats.

To exporting 3D models from Max follow these instructions:

1. When exporting models always select what You want to export and then “export – export selected”.

export_3ds_max_selected

2. Set proper export settings.

If You want to export .fbx use these settings on the picture:

fbx_export_from_3ds_max

Pay attention that “triangulate” has to be selected and up axis is “Y-up”. Otherwise the 3D model will be flipped in 3D Wayfinder.

If You are exporting .dae then use only OpenCOLLADA exporter and these settings:

export_dae_from_3ds_max

There are some minor differences with .dae and .fbx files. You just have to test, what suites better. All the materials can be tuned in 3D Wayfinder Administration panel (see the tutorial), so you don’t have to worry about ambient colors, transparency or other material properties.

We recommend that the whole building should not have more than 100 000 polygons. For kiosk applications (where it is possible to use better GPU-s) you can also have much larger models.

« »

3D Interactive Floor Plan Demo

September 8, 2015

Check out our new 3D Wayfinder platform demo. This will give you short overview of what you can do with 3D Wayfinder and what are our API capabilities.

The demo has following topics:

  1. Moving 3D map with mouse cursor or touch screen.
  2. Clicking on the map and getting location name and description.
  3. Changing floors of the building.
  4. Showing path between 2 locations.

Demo is accessible from the 3D wayfinder home page and can be opened also from this link:

[xyz-ihs snippet=”3D-demo”]

Demo is based on following javascript code. You are welcome to use it in your projects, your HTML should contain canvas with ID “map”. For more info please see 3D Wayfinder embedding tutorial.

var wayfinder;
var map;
var mapContainer;
var poiInfo;
var tutorialArea;
var currentStep = 0;
var STEPCOUNT = 3;
var originals = {};
var floors = {};

function mapResize(){
	if(wayfinder){
		cont = mapContainer.find(".map-area");
		map.attr("width", cont.css("width"));
		map.attr("height", cont.css("height"));
		wayfinder.resize();
	}
}

function runDemo(){
	map = $('#map');
	poiInfo = mapContainer.find("#poiInfo");
	tutorialArea = mapContainer.find(".tutorial-box");
	wayfinder = new Wayfinder3D();
	wayfinder.options.assetsLocation = '//static.3dwayfinder.com/shared/';
	wayfinder.open("1a07bdc53edb3828f390bc9af7281585");
	setTimeout(mapResize, 150);

	wayfinder.cbOnProgress = function(percentage){
		$("#progression").css('width', percentage * 100+'%');
	};

	wayfinder.cbOnDataLoaded = function(){
	    mapContainer.find(".loading-screen").hide(100);
	};

	wayfinder.cbOnMapReady = function(){
		removeAllFunctionality();
		setText(0);
		stepTutorialButtons(0);
	};
}

function stepTutorialButtons(step) {
	var prev = tutorialArea.find(".tutorial-prev");
	var next = tutorialArea.find(".tutorial-next");

	if (prev.text() && step === 0)
		prev.text("").off("click").css("cursor", "auto");
	else if (!(prev.text()) && step !== 0)
		prev.text("<").click(previousStep).css("cursor", "pointer");

	if (next.text() && step === STEPCOUNT)
		next.text("").off("click").css("cursor", "auto");
	else if (!(next.text()) && step !== STEPCOUNT)
		next.text(">").click(nextStep).css("cursor", "pointer");
}

function removeAllFunctionality() {
	if (wayfinder) {
		if (wayfinder.poiController) {
			originals.onPOIClick = wayfinder.poiController.onPOIClick;
			wayfinder.poiController.onPOIClick = function(poi, position, event) {};
		}
		originals.cbOnPOIClick = wayfinder.cbOnPOIClick;
		wayfinder.cbOnPOIClick = function(poi) {};
	}
}

function setText(step) {
	var keep = tutorialArea.find(".tutorial-text").find(".keep");
	if (keep.length)
		keep = keep.detach();
	switch (step) {
		case 0:
			tutorialArea.find(".tutorial-text").text("Click and drag on the map to move or rotate.");
			break;

		case 1:
			tutorialArea.find(".tutorial-text").text("Click on a location for more info.");
			break;

		case 2:
			tutorialArea.find(".tutorial-text").text("Click on a button to show that floor.");
			break;

		case 3:
			tutorialArea.find(".tutorial-text").text("Click on the button to show the path between two random locations.");
			break;

		default:
			break;
	}
	if (keep.length)
		tutorialArea.find(".tutorial-text").append(keep);
	stepTutorialButtons(step);
}

function addFunctionality(step) {
	switch (step) {
		case 1:
			if (wayfinder && wayfinder.poiController) {
				wayfinder.poiController.onPOIClick = originals.onPOIClick;
				wayfinder.cbOnPOIClick = function(poi) {
					poiInfo.show(100);
					poiInfo.find(".title").text(poi.getName("en"));
					var poiDescription = poi.getDescription("en");
					if (poiDescription)
						poiInfo.find(".description").text(poi.getDescription("en"));
					else
						poiInfo.find(".description").text("");
				};
			}
			break;

		case 2:
			poiInfo.hide(100);
			poiInfo.find(".title").text("");
			poiInfo.find(".description").text("");

			if (wayfinder) {
				var showFloor = function() {
					var f = $(this).attr("data-floor");
					if (f in floors)
						wayfinder.showFloor(floors[f]);
				};
				var fs = wayfinder.building.getFloors();
				tutorialArea.find(".tutorial-text").html("<div class='keep'></div>");
				var floorsMenu = tutorialArea.find(".tutorial-text").find(".keep");
				for (var i in fs) {
					if (fs[i] && fs[i].showInMenu) {
						floors[i] = fs[i];
						var button = $("<button data-floor='"+i+"'>"+fs[i].getName("en")+"</button>").click(showFloor);
						floorsMenu.append(button);
					}
				}
			}
			break;

		case 3:
			if (wayfinder && wayfinder.logic) {
				var randomPath = function(times) {
					if (typeof times !== 'number')
						times = 1;
					if (times > 9)
						return;
					var poiList = wayfinder.pois;
					var poiIDs = [];
					for (var i in poiList) {
						poiIDs.push(i);
					}
					var rand1, rand2;
					while (!rand1 || !(poiList[rand1].getNode())) {
						rand1 = rand2 = poiIDs[Math.floor(Math.random() * poiIDs.length)];
					}
					while (rand2 == rand1 || !(poiList[rand2].getNode())) {
						rand2 = poiIDs[Math.floor(Math.random() * poiIDs.length)];
					}
					rand1 = poiList[rand1].getNode();
					rand2 = poiList[rand2].getNode();
					try {
						wayfinder.logic.showPath(rand1.id, rand2.id);
					}
					catch (e) {
						// Try again
						randomPath(times + 1);
					}
				};
				tutorialArea.find(".tutorial-text").html("<div class='keep'></div>");
				var area = tutorialArea.find(".tutorial-text").find(".keep");
				var pathButton = $("<button>Show random path</button>").click(randomPath);
				area.append(pathButton);
			}
			break;

		default:
			break;
	}
}

function removeFunctionality(step) {
	switch (step) {
		case 1:
			if (wayfinder && wayfinder.poiController) {
				wayfinder.poiController.clearHighlights();
				poiInfo.hide(100);
				poiInfo.find(".title").text("");
				poiInfo.find(".description").text("");
				wayfinder.poiController.onPOIClick = function(poi, position, event) {};
				wayfinder.cbOnPOIClick = function(poi) {};
			}
			break;

		case 2:
			tutorialArea.find(".tutorial-text").find(".keep").remove();
			break;

		case 3:
			addFunctionality(2);
			break;

		default:
			break;
	}
}

function previousStep() {
	if (currentStep === 0)
		return;
	removeFunctionality(currentStep);
	currentStep--;
	setText(currentStep);
}

function nextStep() {
	if (currentStep === STEPCOUNT)
		return;
	currentStep++;
	addFunctionality(currentStep);
	setText(currentStep);
}

$(function(){
	mapContainer = $("#demoMap");
	$(".home-video").click(function () {
		mapContainer.show(100);

		if(!wayfinder)
			runDemo();
		else
			wayfinder.engine.run();

		$(window).resize(mapResize);
	});
});

« »

3D vs 2D Wayfinding

May 18, 2015

What is the difference between 3D vs 2D wayfinding and what are the benefits of 3D floor plans?

We have tested 3D, semi-3D and 2D floor-plans with our small focus-group and below is the short summary.

3D_vs_2D_wayfinding_maps

To see the 3D floor-plans in action, please sign up to 3D Wayfinder for creating your own 3D floor-plans, or see our 3D modelling services and examples.

3D Wayfinder supports also 2D images for creating wayfinding application.

Semi-3D maps are rendered or designed floor plans, that are made to look like 3D. The map is rendered on an angle, so it is possible to see part of walls also.

We are using semi-3D maps for mobile devices, where WebGL is not supported yet.

3D vs 2D wayfinding floor plans

 3D floor plansSemi-3D floor plans2D floor plans
Overview of the building
  • 3D floor plans give a good overview of your location.
  • With 3D users see the map the way they see the building in real life.
  • It is possible to show the details, that people use for orientation inside building, for example escalators, pools, statues, tables, benches, trees etc.
  • Showing walls give a better understanding of where you are and it is easier to link the map with a real building.
  • It is easy to understand which floors have atriums and distinguish between things on different plains.
  • Semi 3D floor plans give also a good overview where you are.
  • Semi 3D can be shown only from the one angle, when looking from the other side, they can be are hard to understand.
  • Limited possibility to show the walls of the building.
  • Detailed 2D floor plans don’t give a clear overview, so it is better to use simple floor plans.
  • With simple maps the amount of details are limited.
  • It is hard for users to understand where they are and linking the map with real building is not that convenient.
  • With 2D it is not possible to show the walls of the building.
Usability of wayfinding application
  • 3D floor plans are easy to use. It is always possible to limit the zoom distances and even forbid rotation if needed.
  • Pathfinding is simple and 3D gives a good visual overview for navigating from one floor to another.
  • It is always possible to use camera view for path visualization.
  • Extra dimension enables to add more info.
  • Semi 3D floor plans are also easy to use, but it is not possible to rotate the maps.
  • Pathfinding is more convenient than 2D, as users can see some parts of the walls.
  • It is possible to add more info to the maps as 2D, but it is still not possible to add as many info/layers than 3D.
  • Rotating and moving is not that convenient, especially when looking on the vertical screen.
  • It is not convenient to guide visitors to other floors.
  • 2D floor plans should be kept simple, as there is limited space for layers and info.
  • Simple maps may not provide enough information and visitors may think, that the maps are not useful for them.
Map details and amount of information on the floor plans
  • With 3D there is one more dimension for presenting details and map related data.
  • Billboards on the map don’t disturb browsing.
  • It is possible to show details for better orientation.
  • It is possible to add more details than 2D maps, but the space for information is still limited.
  • Level of details should be kept as simple as possible, otherwise they disturb the understanding of the map.
  • Illustrated details cannot be presented in real size and it can be confusing.
Impression and imago of the building
  • 3D floor plans look nice and realistic.
  • Visitors have a sense of „controlling the building”, which makes them feel good
  • Users understand, that there has been more effort to make the wayfinding for them as good as possible.
  • Semi 3D looks prettier than plain 2D map.
  • Visitors may get disappointed when they try to turn the building, as they expect it to be real 3D.
  • With too simple 2D maps it is possible, that visitors may avoid using maps not to look foolish.
  • Detailed maps confuse visitors and they feel more lost than they were before stepping in front of the wayfinding application.
Displays and future technological possibilities
  • 3D wayfinding can work also with real 3D technologies like holograms, LED-cubes and 3D displays. Unfortunately these technologies are still in prototype phase.
  • With larger displays it is possible to add more details.
  • There is no reasonable point of showing more details with larger screen.
Advertising channel and Digital Signage integration
  • More advertisements can be shown on the maps, as the ads don’t hide the map.
  • Billboard ads on the maps look cooler and attractive.
  • Better than 2D but the advertisements still hide the map.
  • Advertisements disturb the using the wayfinding.
  • Less space for advertisements, as they hide the map behind them.

« »