Turning the Map, Based on the Location of the Kiosk

January 2, 2019

Lately we developed a wayfinding software for a newly renovated mall in Tartu, Estonia. The solution there is simple with just 2D map with no possibility to rotate or drag the maps on the screen. Users get to choose their point of interest on the menu and a route pops up on the map leading the way. In case the location is on another floor, the software simply switches around to show the route on the correct floor.

As 3D Wayfinder is a web-based application, then each kiosk is using web browser with kiosk specific URL for the wayfinding project. The URL specifies kiosk ID, so that wayfinding software can identify which kiosk is being used and count usage statistics. Also URL parameter can specify the rotation of 2D map.

How it´s work?

To make it easier how it works we bring you an example of changing the URL:

1)Let’s say that you have a kiosk with ID number 1. Normally the URL for that kiosk would look something like this: http://clients.3dwayfinder.com/NameOfYourProject/?kiosk=1#!/

2) To rotate that you just need to add “&map2DRotation=90#!” after the kiosk ID number. Here’s an example: http://clients.3dwayfinder.com/NameOfYourProject/?kiosk=1&map2DRotation=90#!/

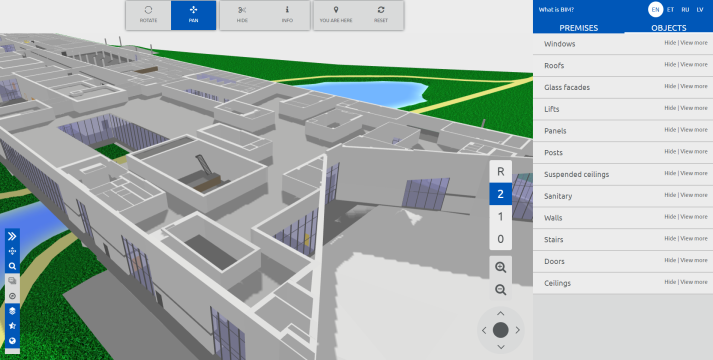
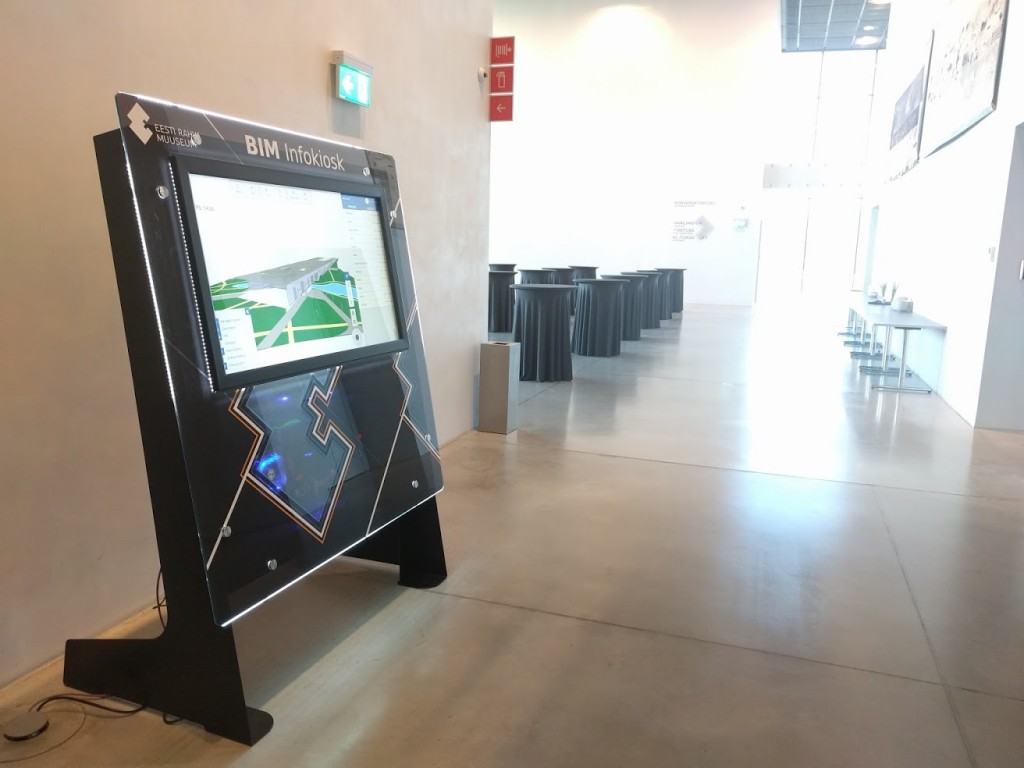
Here is an example of how the map looks on the kiosk inside the main entrance:

Screenshot 2019-01-02 at 13.55.53

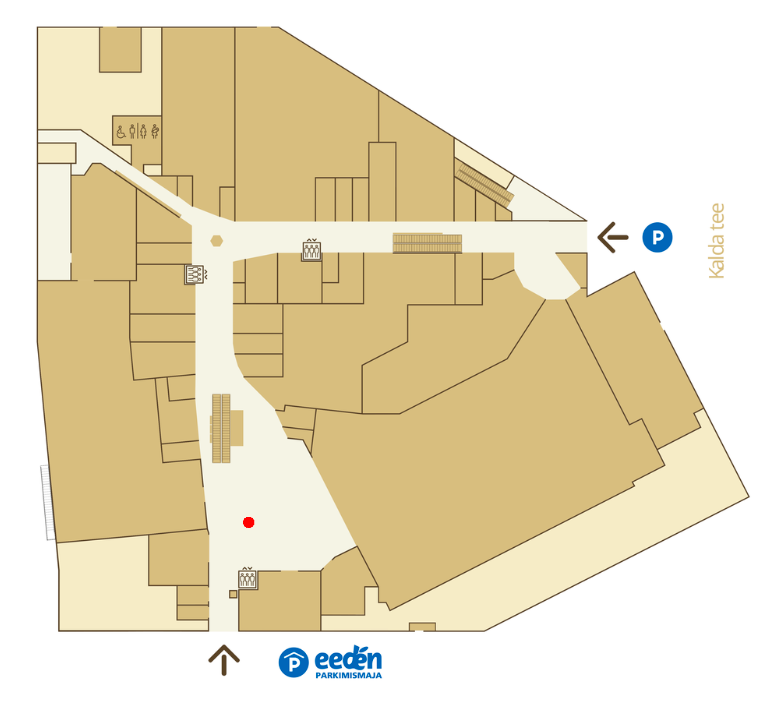
The red “You Are Here” icons make the map universal. Below is an example of the same map being used next to another entrance, the picture is just simply turned toward the user of the kiosk and the “You Are Here” icon placed in front of that particular entrance. This additional solution makes the user experience a lot more straightforward.

Screenshot 2019-01-02 at 13.41.09

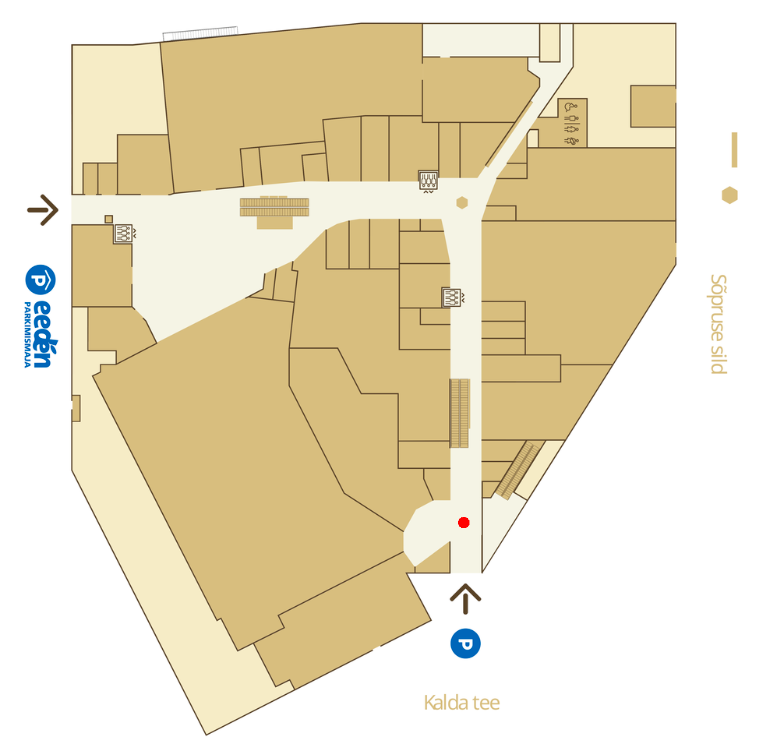
It is also possible to use different kind of arrows for the ”You are here” icon. This way it is simple for the users to understand which way they are standing and how the kiosk is placed in the mall.

« »

Using Widgets in Wayfinding Application

April 13, 2018

Wayfinding applications are not just maps with “You Are Here” dot anymore. There are many possible functionalities and widgets that our customers prefer to see on their wayfinding applications. 3D Wayfinders HTML-based user interface makes it really easy to add and use such widgets in wayfinding application.

As wayfinding kiosks are usually in visible places. Visitors would also like to find other kind of information than the building map and directory listing. Large shopping malls are usually accessible via intercity bus or metro stations. It is important to find the commuting schedules. Also in larger modern shopping malls. There are integrated cinemas, which would also like to show their programme.

Nowadays people have smartphones, that can show weather forecast and date beside the clock. But still one of the things our customers are asking for quite often. This is a clock integrated to the wayfinding application.

wayfinder widgets

We have created a NPM package ‘ng.clock’ for the widget. It can be found at https://www.npmjs.com/package/ng.clock. Demo of the clocks can be found here https://codepen.io/tonister/pen/qpyBgQ. This clock widget is made as an AngularJS 1.x Directive. The choice to use AngularJS is due to the fact that almost all our latest templates have been created using AngularJS.

3D Wayfinder user interface is created with HTML. It is easy to implement any widget or integrate bus or cinema schedules inside wayfinding application user interface. Although it might be good to mention that for some of these features the API licenses are not free. If they are free then they are very limited.

Thanks to HTML5 based layouts it is easy to integrate different kind of widgets in wayfinding application. For example exchange rates, events, news, weather forecasts, social media feeds, CAP alerts, time remaining till closing.

« »

Installing iBeacons is Easy

November 14, 2017

We have finished installation of approximately 250 iBeacons for mobile app positioning. Although the installation process is easy. There are some tricks and common practises to follow, when setting up iBeacon based indoor positioning.

iBeacons installation

iBeacons are cost effective indoor positioning devices, that are really easy to install. As each iBeacon has it’s own battery, that can last about a year, then there is no need for external power supply. Devices are very light, so it is possible to mount them by using double-sided tape.

Even though the installation of one iBeacon is a simple matter. Overall installation process can be quite long and somewhat physically exhausting due to the constant climbing up and down the ladder/platform.

At first glance it might seem that the device will disrupt the look of the building. But, as we can see from the image below, if you take into consideration the overall theme and look of the building during choosing of the device, it merges into the plethora of different sensors and equipment covering the ceiling.

Installing iBeacons

Before installing devices. It is important to mark down the specifications for each iBeacon device. Each iBeacon has it’s parameters: unique ID, name and range.

It is also a good practice to mark the iBeacons. So that you know you’re installing the correct device to the correct location. For this we used a label printer.

iBeacon

Plan before iBeacons installing

It is good to have a plan before physical installation. We used the map of the building to first draw a layout of the placement of the devices and their coverage area. It is a common practice to have a minimum of 3 iBeacons covering any part of the mappable area for the navigation to work efficiently.

iBeacon coverage map

Configuring iBeacons in 3D Wayfinder is also easy. Just create a node with type “iBeacon” and enter iBeacon parameters (UUID, Name etc.). To manage all the devices from one place, open “Beacons” from the left-side menu. You can do this prior to the actual installation when you are confident that your layout will work.

iBeacon management

It is highly recommended to install the iBeacons to a height unreachable for the visitors of the building, so no one could easily snatch them. We installed the devices onto the ceiling. For this we used a painters platform that had wheels on them so it is easy to move it around the building. We recommend setting the platform to a height so the person installing the devices could stand up straight and then reach the ceiling without having to stretch too much.

Good time to install iBeacons in a shopping mall is when there are not that many people.

Here you can find more information about using iBeacons with 3D Wayfinder. If you’d like to test iBeacon-based positioning, please submit the request form for demo iBeacons.

« »

New Administration Panel is Up and Working

September 7, 2017

It has taken some time and lots of effort but we have finally made it. New 3D Wayfinder administration panel is finally online and usable for all clients.

new admin

We have made many smaller and bigger improvements to make 3D Wayfinder administration panel  easier to use. Especially for new clients. For example the editor has been changed to make it more logical. All the materials have previews for better overview and managing of 2D maps is more convenient.

It should also be more comfortable for those who prefer to use our app on smartphones or tablets.

There are still some kinks to straighten out so if you notice something that isn’t working the way it is supposed to, let us know.

“Sign in” leads straight to new administration panel but if you prefer to use the old one, go to old.3dwayfinder.com or use the link at the bottom of the sign in page. 

« »

Creating BIM Applications with 3D Wayfinder

June 15, 2017

3D Wayfinder is now being used for Building Information Model (BIM) applications. By creating BIM kiosk software for Estonian National Museum we have added many new and useful features to our software and improved the performance for larger models.

Estonian State Real Estate Ltd ordered Building Information Model solution from us for recently opened Estonian National Museum. Now the visitors can easily explore the 3D model of the whole construction. Also they get the overview of the building by all the details.

erm2016

What is BIM applications?

BIM model is a digital equivalent of the building. It can contain everything from doors to electric fixtures. Although BIM applications technology and methodology is more common in the design of the building. It has large potential benefits for buildings management and maintenance phase.

Estonian National Museum’s new building is meant both for exhibitions and scientific work with net area of 33 879 square meters. We received a model of a building made with Revit, Autodesk software for BIM. It contained highly detailed information – e.g. all the pipes – so it needed a lots of simplifying.

erm_wayfinder_BIM

After the adaptations we still had a huge file with close to 12 000 separate elements. It is the largest model we have had in 3D Wayfinder. It was also the reason why we changed the logic of initializing POI data to make the loading of large objects faster.

Table view for all objects in BIM model was done by using Spreadcell. Spreadcell has easy upload from MS Excel files and it provides table-view, sorting etc by webservices (in JSON format). All the objects are divided into separate groups so the final user can choose what do they want to see, hide or find.

ERM_wayfinder_BIM

Kiosk design

We also built and designed the kiosk from scratch. Since most of the modern kiosk hardware is only enough for showing advertisements or 2D wayfinding plans. The kiosk is equipped with a landscape LCD screen, a touch panel and a dedicated graphics card. It makes kiosk suitable for applications that require greater graphical computing capabilities.

ERM_BIM_kiosk

3D Wayfinder application helps to make BIM useful for those who have no access to specific softwares themselves. For example we can integrate BIM with different management softwares. Also add the ability to write comments. In this way we make it easier for different parties to collaborate on centrally shared model.

« »

New Reflection Feature in Our 3D Engine

December 18, 2015

FRAK WebGL engine has now built in Cubemaps and reflection shader. This gives 3D Wayfinder access to use reflections of surrounding area.

We have added built in cubemaps and cubemap reflection shader to FRAK WebGL engine. In addition reflection with cubemaps is efficient way to create reflective surfaces like glass or mirrors.
Also cubemap reflection is a rendering method. It means that reflective surfaces reflect the cubemap textures.

Cubemaps_and_reflection_shader_frak_reflections_webGL

It will be available for 3D Wayfinder in near future. This will be the effective way to create large glass walls or buildings. It make them more realistic. It might be used also for expensive shopping mall floors.

Next feature in FRAK will be specular map to mark efficiently reflective areas.

Cubemap demo can be found under FRAK repository.

« »