This tutorial will show you how we use bevel in some of our 3D wayfinding maps.
There are 3 main options in Blender to get the beveled edge look.
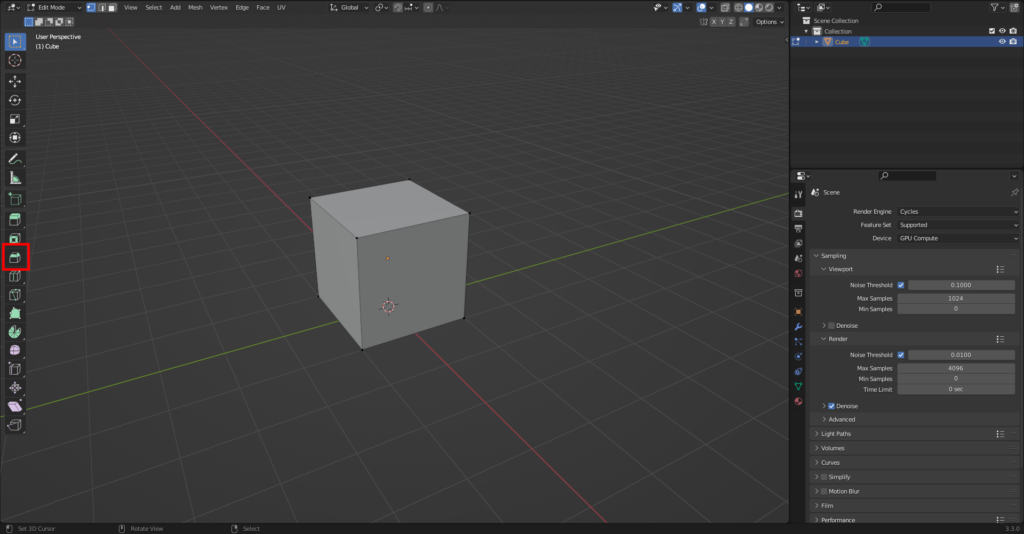
First is the Bevel Tool
Select the object you want to bevel in Blender, go to edit mode then select the bevel tool from the left row (press T key to enable it if it’s hidden).
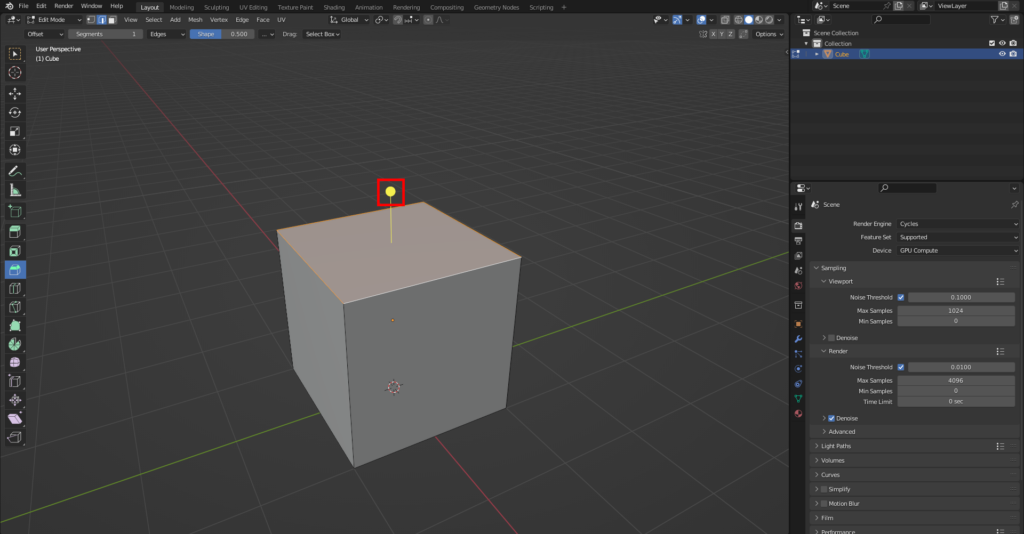
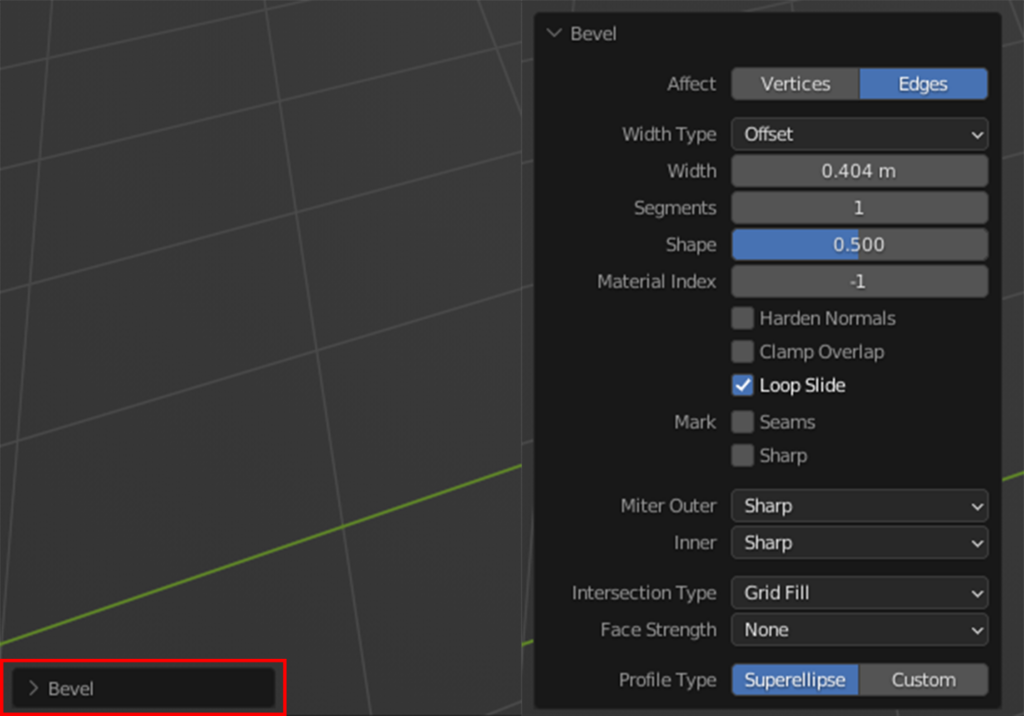
Select the edges you want to bevel and click and drag the yellow circle to adjust bevel amount. When satisfied you can further fine tune it in the toolbar that’s located on the left bottom side. Faster way to add the bevel tool is to use shortcut ctrl + B and adjust amount with mouse. Press right mouse button when you are done.
Second, Less Common Way is to Use Extrude & Scale
Select the object you want to bevel in Blender, go to edit mode then select the face(s) of which edges you want to Bevel. Extrude (press E key) the face(s) on z axis (press Z key) and move them up a bit. Then scale them down (press S key) until you have the desired look.
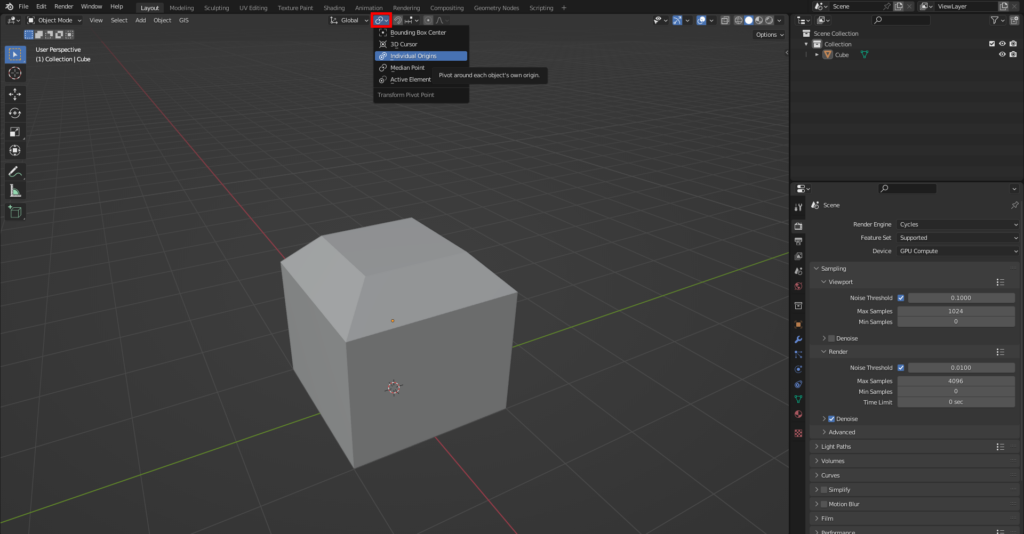
WHEN YOU ARE BEVELING MULTIPLE OBJECTS AT THE SAME TIME MAKE SURE TO CHANGE TRANSFORM PIVOT POINT TO INDIVIDUAL ORIGINS.
Final and Nondestructive way
Nondestructive meaning that the bevel doesn’t fundamentally change the mesh. This also means that you have to check the apply modifiers button when exporting mesh.
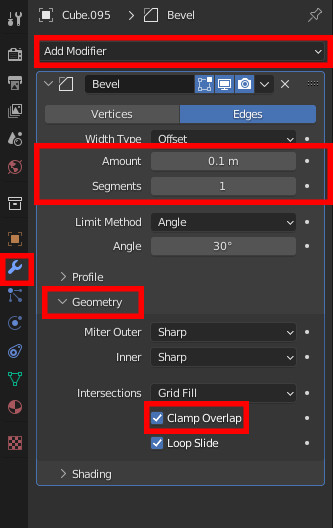
Go to modifier properties (blue wrench icon) and click add modifier then click bevel. Leave segments to 1 and adjust the amount to your liking. If it doesn’t work right away then go to geometry tab under bevel and turn off clamp overlap and correct the amount.
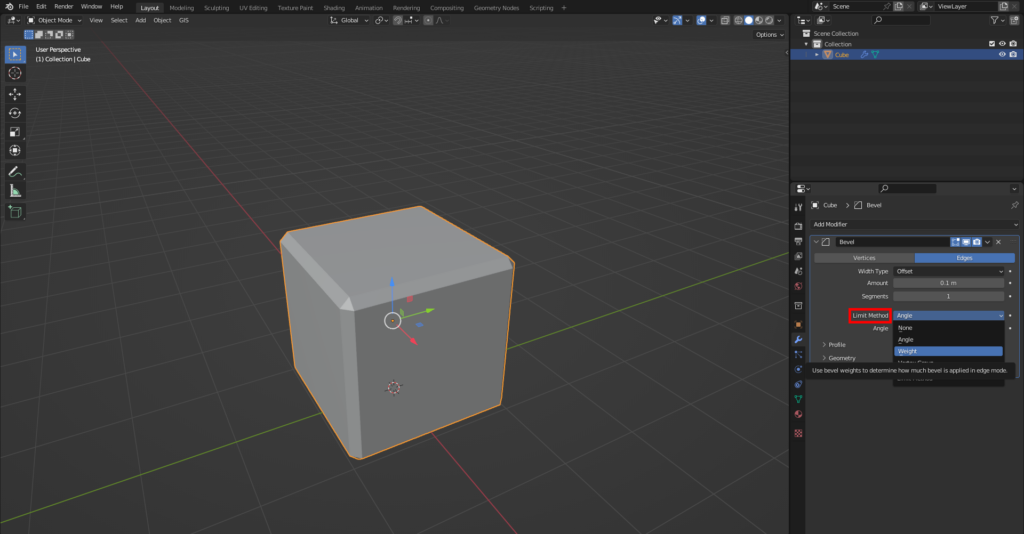
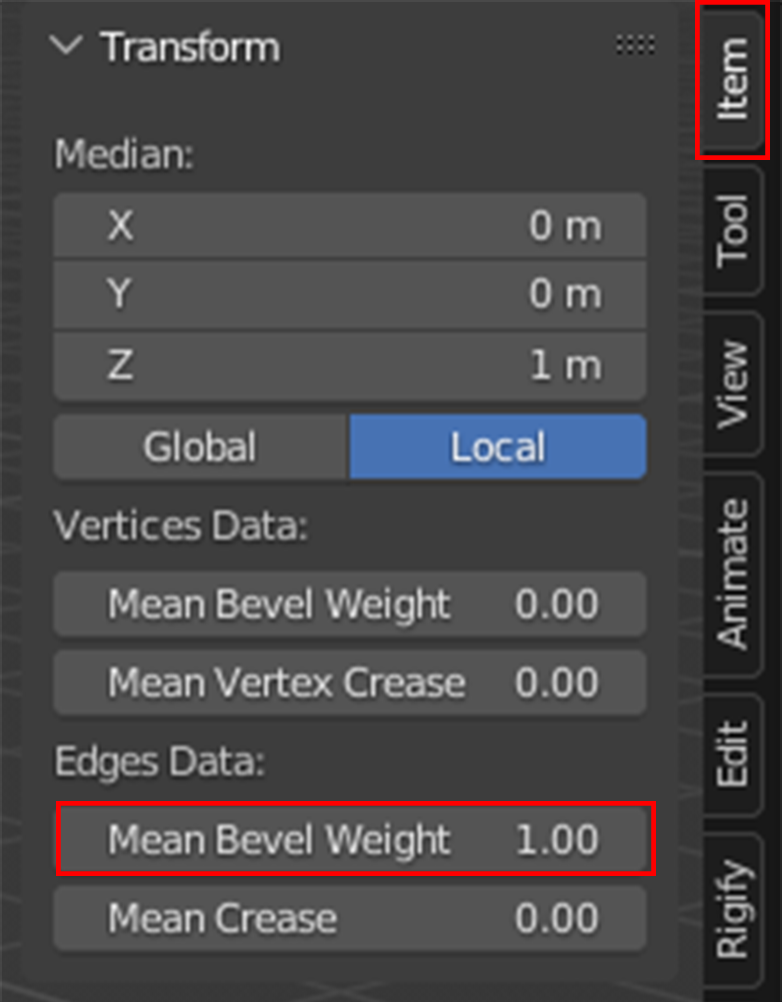
To add bevel only to those edges that you want, change limit method to weight. Go to edit mode, select the edges you want to bevel then open right sidebar (press N key) under tab “item” change the mean bevel weight to 1.
Before Adding The Bevel Modifier it’s a Good Practice to do and Check The Following
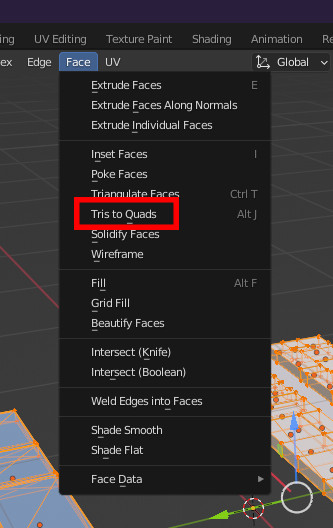
1. Mesh needs to be clean and use only quads.
Removing tris– select everything– go to edit mode– make sure everything is selected– then use ALT + J or on the top bar go to Face– “Tris to Quads”.
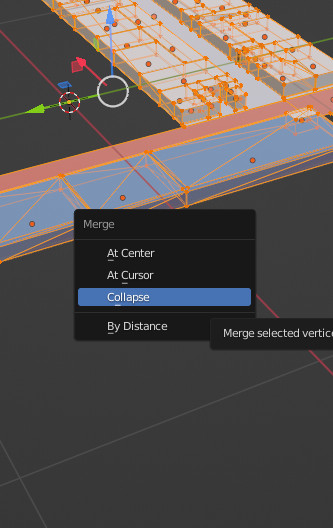
If there are still some tris then have to manually merge them. Select the vertices and press M– “Collapse”. Second option is to just remake the whole box.
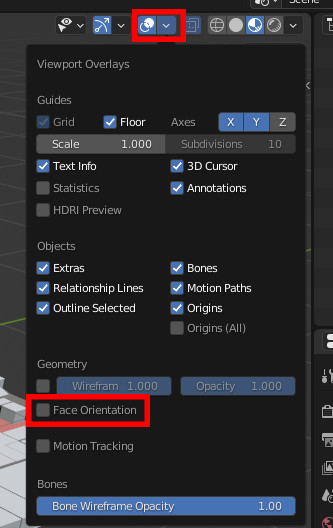
2. Make sure that normals are correct. Check this by going to “Show Overlays” and enabling “Face Orientation”. If Everything is blue then move on to step 3.
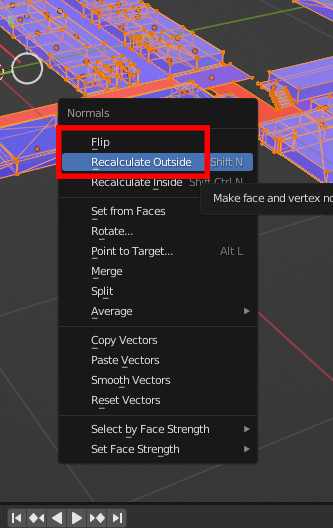
Fixing normals– select everything– go to edit mode– make sure everything is selected– use ALT + N– “Recalculate Outside”.
If some are still red then you have to manually select the red ones and use “Flip”. (ALT + N)
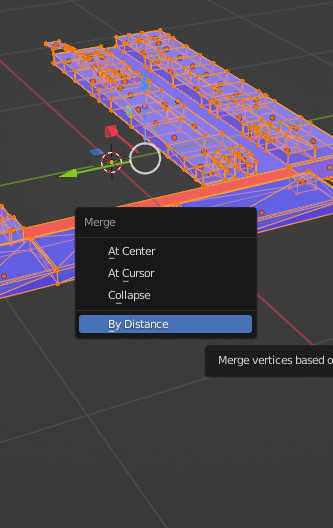
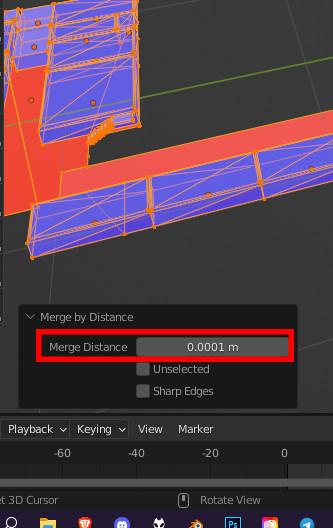
3. Make sure there are no Doubles.
Select everything– go to edit mode– make sure everything is selected– press M then click “By Distance”– open the little box on the left corner of the screen– set merge value to 0.00001 m
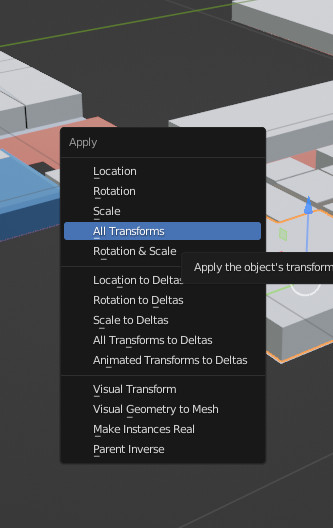
4. Make sure Object scale is set to 1 on XYZ.
Select 1 object– use shortcut CTRL + A– click on “All Transforms”. Do the same for every object.
In this post, we will introduce different options for designing 3D map. A map mostly serves the task of guiding people, but there are many different ways to design a map. When designing a map, a lot depends on what the map is designed for, which people use it, what kind of user experience they expect and what added value the map should create.
Detailed designing of 3D model
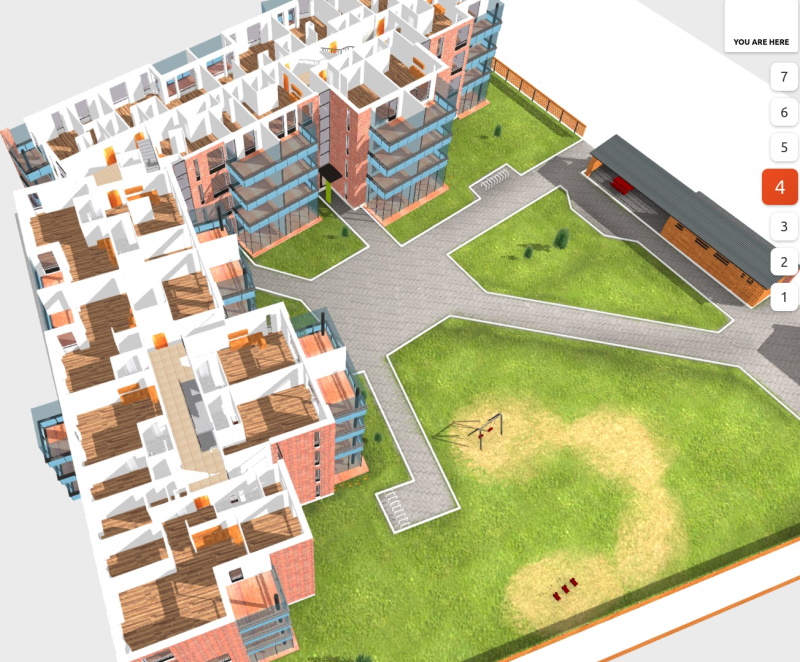
With 3D Wayfinder, you can design your own 3D map, but we also offer a complete solution with several detail levels. One way is to create very detailed designing 3D map. These are models where the textures are precise, so that it looks as real as possible. Such a 3D model is important for advertising apartment buildings, so future residents can get a very accurate idea of their home.
Detailed 3D model view of the apartment building and the courtyard
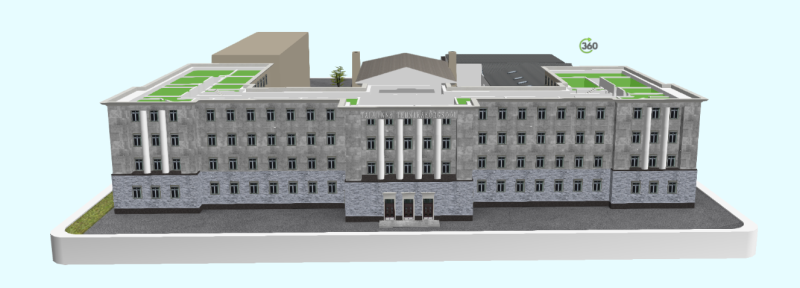
It is not always necessary to create detailed models for the purpose of selling houses or apartments. For example, the building of the University of Applied Sciences in Tallinn has historical value. They wanted to bring a historical feel to the 3D map as well. Therefore, a detailed and realistic model was created for them.
Tallinn University of Applied Sciences 3D model view of the main building
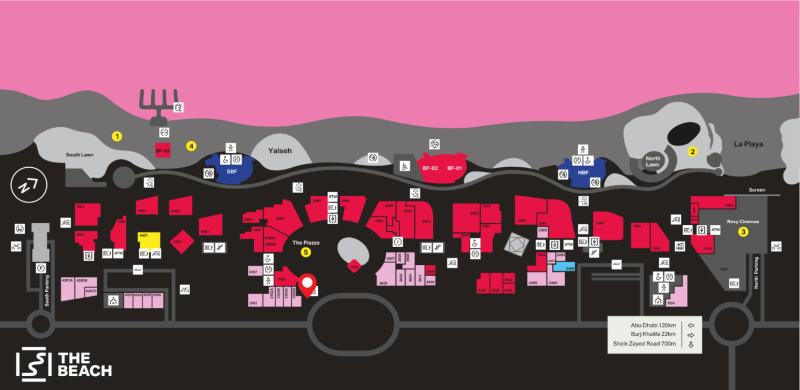
Funway 2D map
A complete opposite to the realistic models are 2D maps. This is a map drawn using the FunWay method, which does not convey a real image, but has a nice design and is understandable to all users.
2D map view of Beach Mall in Dubai
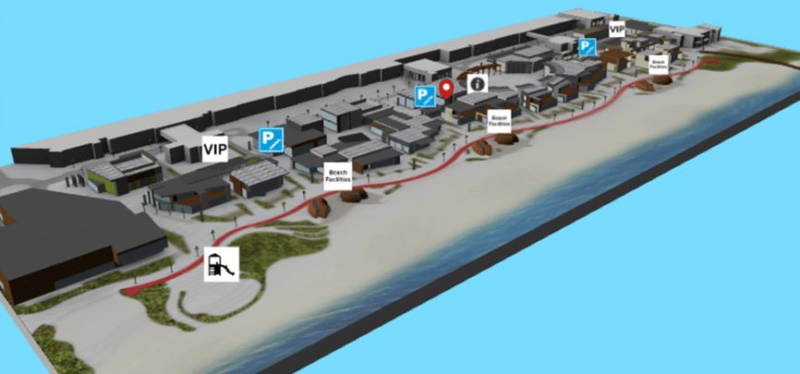
We have also prepared a detailed 3D model for them, which is much more realistic and the icons on the model are slightly more emphasized.
3D model view of Beach Mall in Dubai
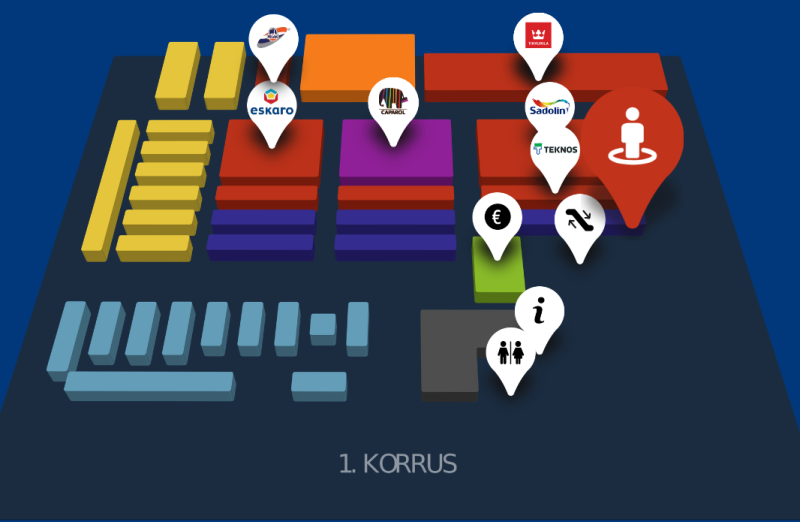
Simplified map view
Everyone is probably familiar with the feeling of getting lost in a hardware store and spending time for lookinf certain products. We have prepared an interior map for the hardware store in Estonia, by shelves and departments. Pins for products from specific companies have been added to the shelves and departments, which makes it much easier for customers to search for specific products. Creating such a card is quick and easy. For customers, it makes the experience of visiting a hardware store more pleasant.
A simplified map view of the hardware store with product brands
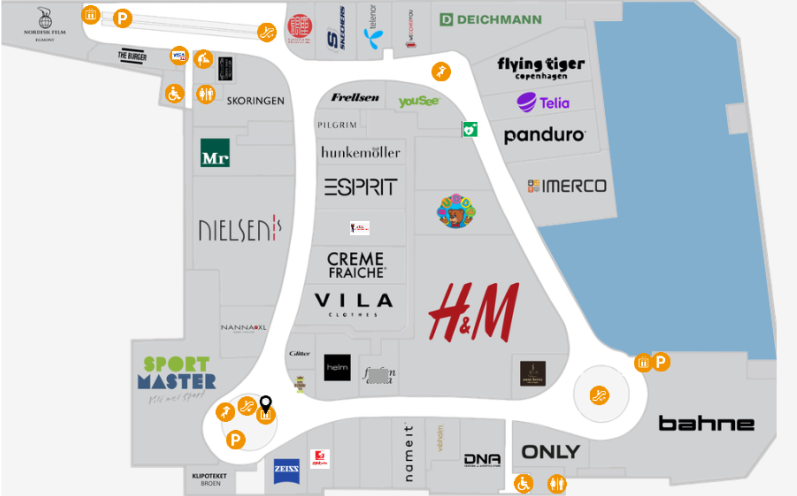
A similar simplified map is suitable for shopping centers, where different businesses can advertise themselves by the logo attached to the map, and it is much easier for the customer to find the desired location.
Wayfinder solution of a large shopping center in Denmark with logos
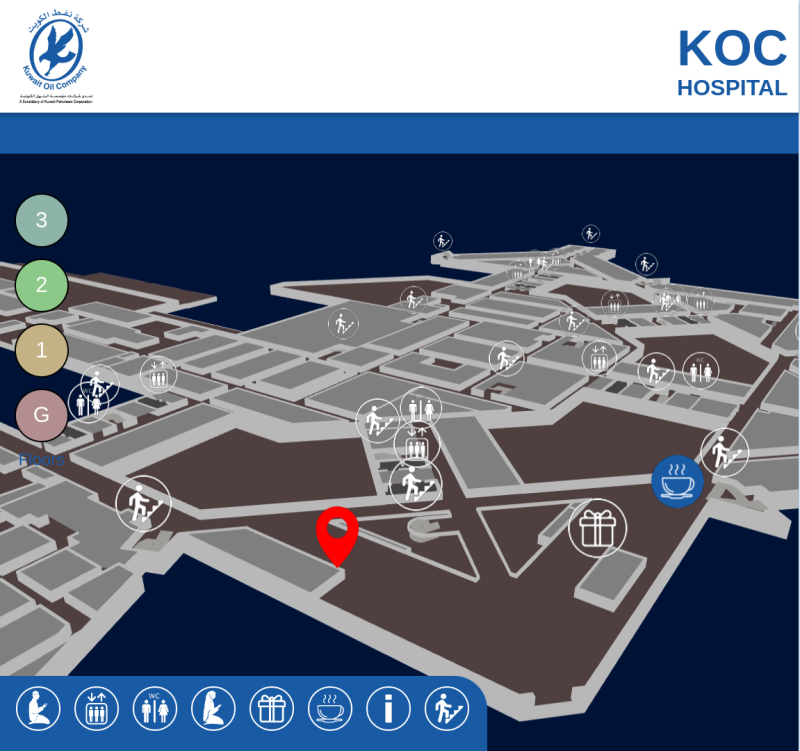
Color based design
The designing 3D map can be based on the colors of the website or logo. For example the Kuwait Oil Company hospital map is inspired by the dark blue color of their website and logo.
Kuwait Oil Company Hospital Wayfinder map
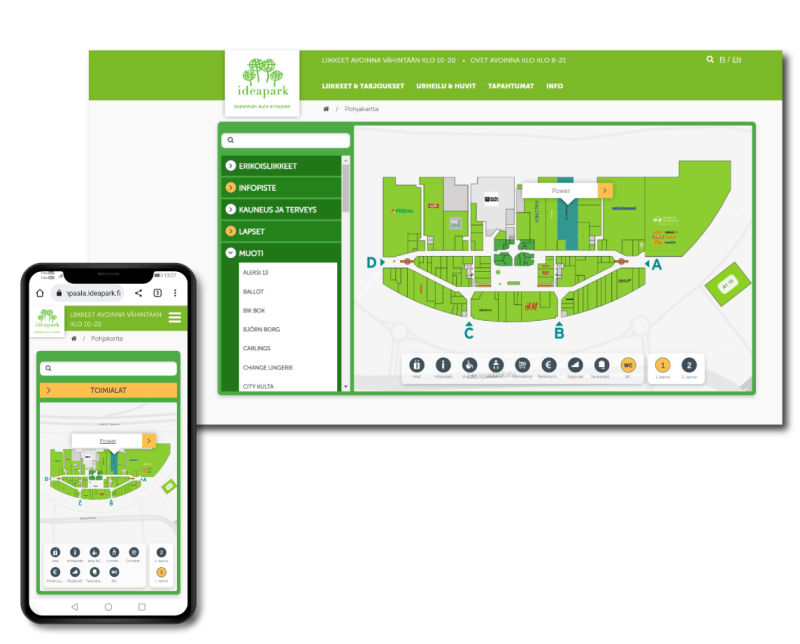
Similar to the color scheme of the Kuwait hospital, a map has also been created for IdeaPark based in Finland. The color scheme of the IdeaPark shopping center is green, and a map was made for them with the same color scheme.
Map solution for the IdeaPark shopping center in Finland with mobile integrations
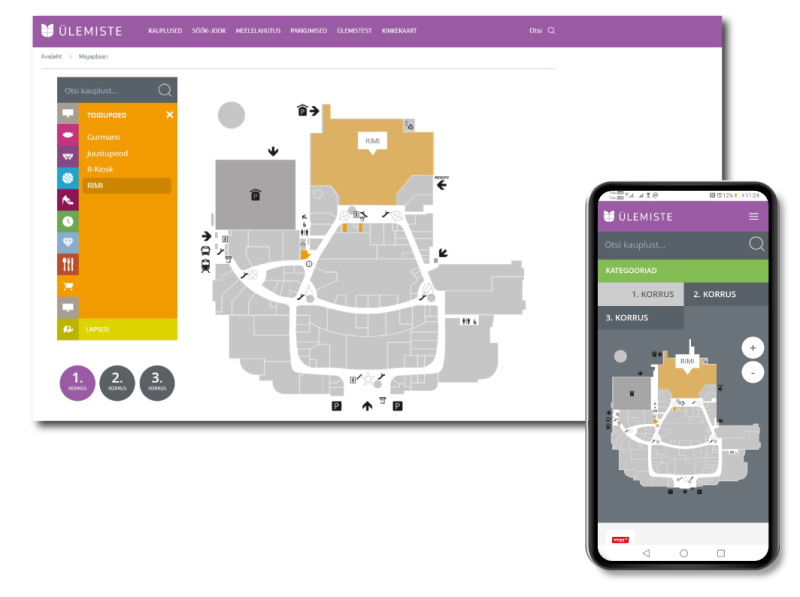
In addition to 3D models and maps, 3D Wayfinder also offers the option of creating a mobile app. The Ülemiste Center in Estonia has requested such a solution. Clients of the center can use the map application on a personal mobile device. The background of the Ülemiste Center mobile application map is displayed in a dark color to make it more visible on a small screen.
Map of the Ülemiste center with the solution of the app on the mobile device
As you have seen, 3D Wayfinder can design very unique looking maps. In addition to the big picture, there are many options for fine tuning. For example, it is possible to choose colors of the ceiling, floor, walls and other similar surfaces. It is also possible to change shapes and colors of the road guidance, shape and color of the adjacent menu and much more. All this affects the user experience and creates value for the branding of the building or company.
Helping visitors doesn’t have to be just a cost. It is possible to earn revenue with 3D Wayfinder software and you might be surprised how profitable it actually is. It is like getting 200 m2 rental space with minimal investment.Below we present in more detail how it is possible to earn revenue with wayfinding.
Digital signage is developing at rapid speed. Besides more and more advertisement screens, there will be large LED displays, self-service terminals, 3D hologram projectors etc. Main content of course are advertisements. But the case with most of them is, that they are just like TV advertisements – people know how to ignore them and targeting is bad.
Advertising with wayfinding software can be different. It is somewhat similar to targeted ads in search-engine: you type the keyword and ads with this keyword will be shown first. Difference between just targeted ads and Wayfinder is, that while targeted ads could be good for you, they sometimes yield inferior results. When you search some company and get their advertisement first, it is useful, it makes you just click on that add. When you look something specific and get 5 ads first, then it is not so user-friendly at all. Wayfinder aims to do differently.
Wayfinding software is not search engine and would simply help to find what you are looking for: shop, brand or product category. Our targeted adds are bonus for your search – get best meal or find a shop with better discount. Even if you are looking for an exit, you might find a nice shopping deal when exiting the mall.
Different advertisement options
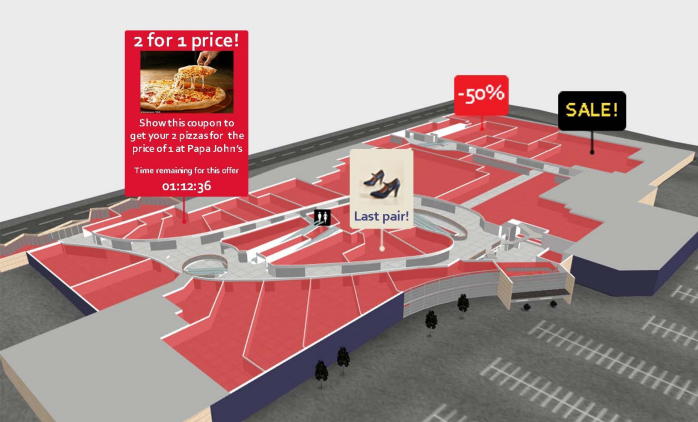
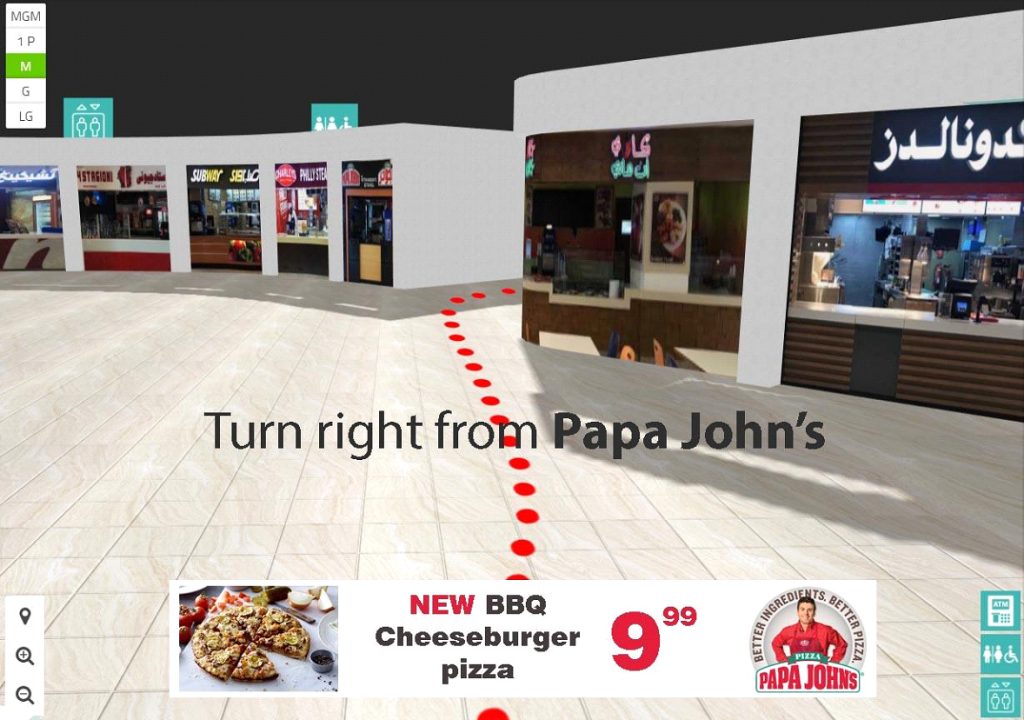
3D Wayfinder has different advertisement options. Besides traditional banner ads there is also a possibility to show advertisements on map, even on the 3D map:
Advertisements can be also land-marks. For example, you can be guided around the pizza place and at the same time you will see the daily pizza offer as an advertisement.
Besides improving advertisement features, we are working with technology to show advertisements in augmented reality (AR). It means that you can see the path on your mobile device camera screen and at the same time see offers and promotions, pointing to the right shop or place.
Wayfinder ROI calculations
Ok, lets talk about the numbers. Each shopping mall is different and rental-prices and revenues differ by a country. For specific calculations, please contact our sales department. Following numbers are rough estimates.
Let say the initial cost for wayfinding is following:
Wayfinding screens with set-up (5 screens) – 15 000 euros
Wayfinding software with maps – 5 000 euros
Printed QR stickers, advertisement for tenants, labor cost – 5 000 euros
In total the costs will be around 20k euros. It is quite a small amount, comparing to expansions of the mall building, creating new inner-walls or setting up large LED-screen.
Now let’s say that there are about 100 tenants in shopping mall. Some of them might be larger anchor-tenants. If each tenant pays 5 euros per day on average (it is not a large amount in comparison with search engine adds that might cost 1 euro per visitor). This means only 5 clicks per day (when taking 1 euro per click). Besides, visitors will certainly spend more money while in the shopping mall, opposed to just surfing in web.
It means 5 euros (average amount spent by tenant) multiplied 100 (number of tenants) makes 500 euros per day and about 15 thousand in month. This means that the ROI of wayfinding software is only a little-bit over a month. There are not many investment options with that good profitability!
When we take rental price of 15 euros per square meter, this additional 15 thousand means that shopping mall gets the same fee as renting out 1000 m2. Building additional 1000 m2 is probably more expensive that 1 million euros. This means using wayfinder solution with advertisements is as profitable as additional 1000 m2, but instead of costing 1 million, it only costs 20 thousand.
Following figures are illustrative and depend on type of the building (mall), location, visitors’ profile, tenants etc). To calculate ROI based on your project, please contact our sales team.
3D Wayfinder wayfinding software can be purchased in different ways. In this post we will give a short overview of possible licensing options. Choosing suitable licensing type depends on your (or your customer) needs, but we will certainly be able to find the optimal solution for each project.
First of all, 3D Wayfinder is licensed per project (building or block of buildings). This means we don’t count number of kiosks, users or building size. This makes licensing transparent and simple. When adding kiosks/totems to the building later, you don’t have to pay anything extra. Licensing is also the same for wayfinder end-customers and resellers. There is no difference in licing model. Of course, for our partners (resellers, system integrators, digital signage providers etc.) we can make discounts from 3D Wayfinder prices.
There are basically three options for licensing:
Using 3D Wayfinder as a service (SaaS)
Lifetime license (one-time payment)
Enterprise license for private server
All these options are covered below.
SaaS licensing
Buying software as a service (SaaS) is most common way to sell software nowadays. It is mainly used for web-based software and it means you can access the software as long as your subscription is valid.
3D Wayfinder can also be purchased as a SaaS. There will be discount when paying longer periods upfront, but it is possible to pay also by months. This makes it flexible, so when there is no need for wayfinding anymore, you can just end the subscription. This might be good option to one-time exhibitions or events where wayfinding is needed but only for the time event takes place.
For resellers we have also SaaS based licensing option. In this case software is hosted in virtual private server (VPS) and there is everything needed for custom branding (White Label). For more information, please contact our sales.
Lifetime license
Lifetime (or Perpetual) license means, there is just a one-time fee for the software. Wayfinding software is still being hosted in our server, but the customer owns the software.
All the updates are available without any extra cost. Everything works like SaaS, but without any additional payments for the software.
In case we have to stop providing software in our servers (this will hopefully never happen), then our customer can get an Enterprise license (with right to install software to their private server).
Lifetime license is a good way when you want to minimize the running costs, especially because with 3D Wayfinder all the content can be administrated by yourself.
When you buy kiosks or touch-screens, then you can buy also wayfinding software. Only thing you have to worry about is electricity and internet (when using 3D Wayfinder offline snapshots https://3dwayfinder.com/offline-wayfinding/, kiosks don’t even have to be connected to the internet).
Enterprise license
3D Wayfinder enterprise license is for hosting wayfinder software in private server. This type of licensing is good for resellers, allthough very often also large shoping malls, government organizations, hospitals and companies use this option too.
Installing wayfinder software in private server has many advantages: customization, security concernes, direct access to wayfinding data etc. Server can be setup to be accessed from local network only, which makes loading large 3D maps faster and makes all systems very secure.
For enterprise server we provide regular updates, so all the new features in 3D Wayfinder can be added to enterprise installation also.
More and more schools are using wayfinder kiosks. Besides building plans and directories, touch screens are useful for providing information and promoting upcoming events. They are a good way to show lesson plans, contact data and transportation schedules.
Have you ever got lost in school? You might remember your first day in college and looking for your classroom. Besides dealing with natural first day stress and anxiety, you now have to look for the right room and worry that you will be late for class.
If you don’t remember this, then maybe you have been to an university building for a seminar or a conference, looking for the right room. You don’t have the time to wonder around and first thing you do is look for a building plan.
With wayfinding software it is much easier. You will see the upcoming seminar on the screen and with just one click, you will get directed to the right room in the right building. No more searching and wondering around.
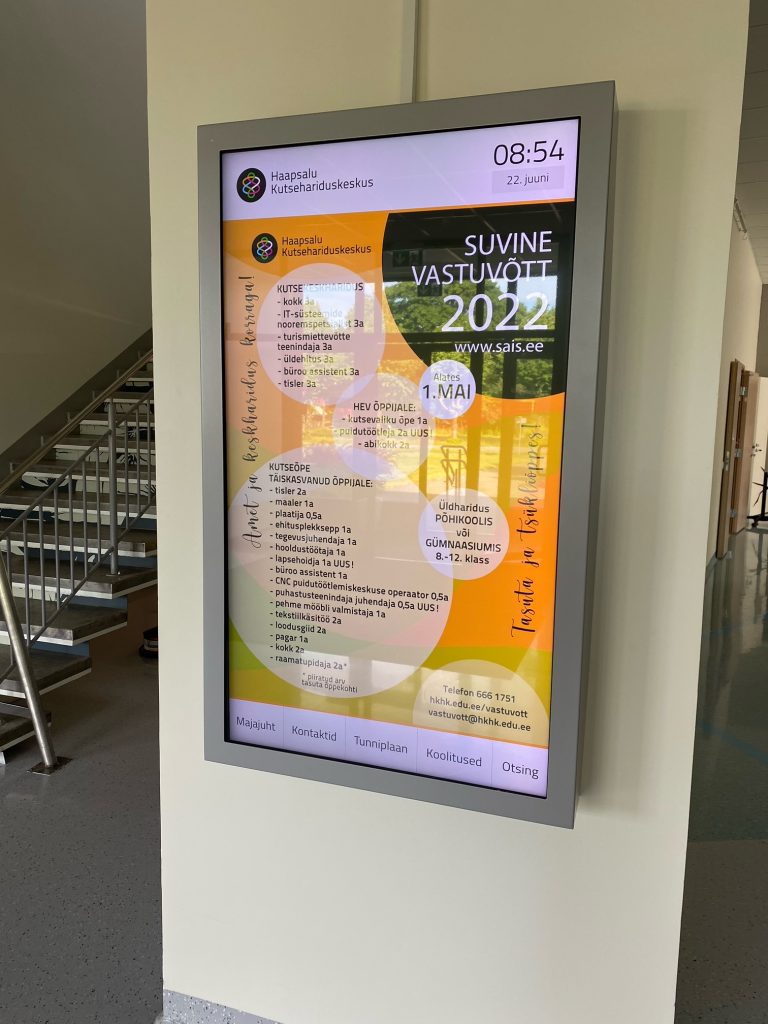
Last year we finished setting up wayfinding solution for Haapsalu Vocational Education Center. They have a lot of students who are taking distance learning courses. As students drive to school 1 or 2 times a month. They are very happy to see wayfinding screen with a timetable.
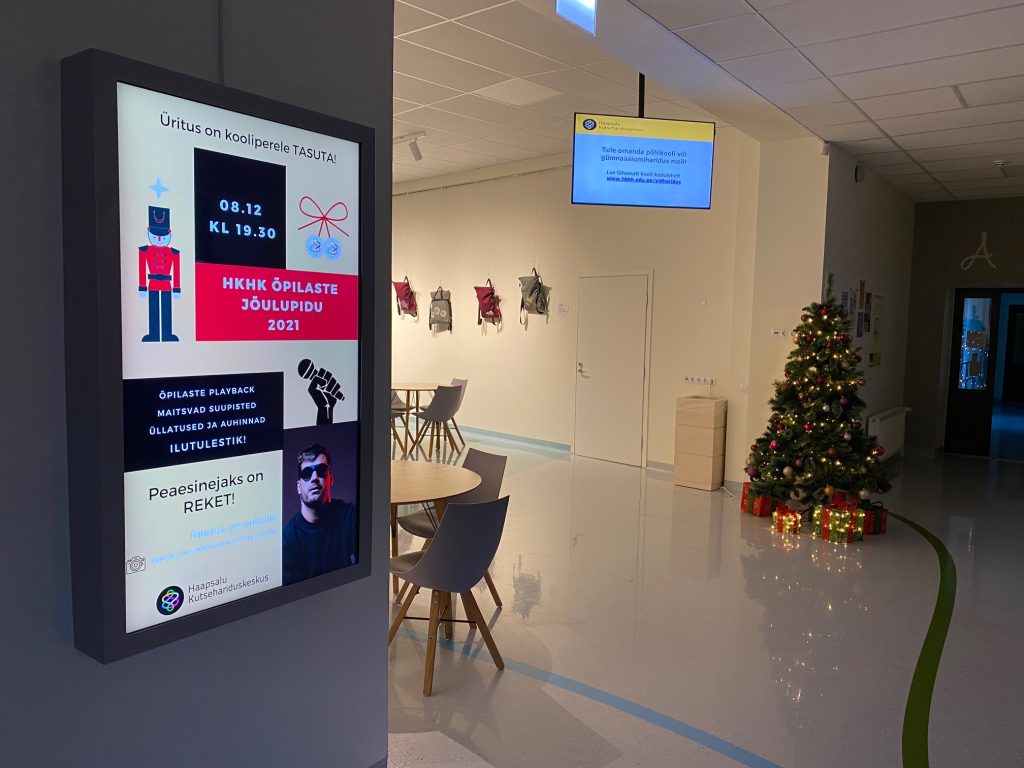
In Haapsalu Vocational Education Center, wayfinding touch-screens are actively being used to promote different events – from Christmas Party and free courses to student exhibitions or defending final thesis. In information technology classes students can build their own map and use with 3D Wayfinder software. This allows student get practice in 3D modelling and see how it can work in real life application.
For schools, colleges and universities we have educational discounts for wayfinding software licenses. Please contact us for more information.
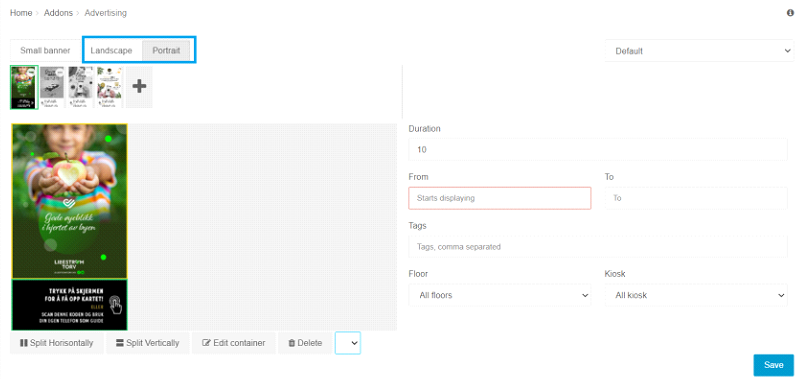
We have done many improvements in 3D Wayfinder Advertisement module. Many updates have been added to improve usability and functionality of managing advertisements in wayfinding software.Below you can read what options we have added to our advertising options to make advertising with wayfinding even more effective.
User experience
User experience (UX) is extremely important for us. Many of our customers use advertisements with wayfinding software very actively. Wayfinding is important part in shopping malls’ Digital Signage package, as Wayfinder kiosks are not just screens on the wall, but they are useful tools for visitors.
Advertisements in Wayfinder software can be used to promote upcoming events, share important information like opening hours etc. At the same time, it would be possible to promote also shops, services and products. Advertisements can be set-up to run in kiosk idle mode or they can take a part of screen also next to Wayfinder map and directory view. By using large touch-screens, it might even be practical to show advertisements in more than 2 areas.
Important improvements of advertising with wayfinding
Some of the important improvements include:
⦁Drag-and-drop feature for changing advertisement frames
⦁Default duration setting for video adds
⦁Improved splitting of advertisement areas
⦁Easy separation of Portrait and Landscape screens
We also updated Advertisement module tutorial and now the tutorial can be directly opened from Advertisement module in 3D Wayfinder administration panel.
How to create DIY 3D wayfinding maps? It is not that hard as it may sound.
Following post will give you an overview on how to create 3D models for wayfinding software. In addition we will share you videos of the modeling process.
Here are some general guidelines to keep in mind:
Maintain a clean quad topology and keep poly count low, no need for edge beveling and subdivisions, when the situation does not require it.
The floor, outer walls, inner walls, details, locations, stairs, elevators, locations and greyed out areas must be separate objects, please do not combine them into one.
Its also recommended to group objects of the same kind and name them accordingly.
The following videos will show some tips and tricks to make your workflow faster.
The solidify modifier will help you create quick walls for your model. You can either first model the walls and then apply solidify or do it the other way around.
Using the Archimesh addon (comes with Blender) you can make great looking stars with just a couple of moves.
NB! When you are in the process of cleaning up your Blender file like shown above, sometimes the spare material doesn’t disappear after using the purge function. If that happens then just restart your Blender project.
We hope you got a better understanding of how to create 3D wayfinding maps.
As always we are pleased to help you for creating a wayfinding solution for you or your customer. If you like us to make the maps, please also look our floorplan campaign and don’t hesitate to contact us.
How are 3D map models made in Blender? Here is a step by step look.You find detailed blender modeling tutorial with videos and specific guidelines.
BLENDER MODELING TUTORIAL GENERAL GUIDELINES
Maintain a clean quad topology and keep poly count low, no need for edge beveling and subdivisions, when the situation does not require it.
The floor, outer walls, inner walls, details, locations, stairs, elevators, locations and greyed out areas must be separate objects, please do not combine them into one.
Its also recommended to group objects of the same kind and name them accordingly.
1. SETTING UP THE SCENE AND MODELLING REFERENCE
Before starting the model make sure you have references ready.
Create JPEG or PNG files from the reference DWG’s or pdf’s.
If the buildings have multiple floors, make sure that the images have the same dimensions and the floors align with each other.
1.1 SETTING UP THE SCENE
Start by setting up the folder system for the project and adding the reference images into this folder system, then prepare the scene for modelling by setting the units( make sure units are consistent throughout the project). We use SI units( metric units), usually meters.
Now you can either create the basemap itself first, based on the provided references or you can create a simple rough layout for the building placement and replace it with a basemap later, based on the provided DWG and pdf references. For following examples, I took the rough layout route. Make sure the rough layout texture has dimensions relative to the upcoming basemap and is placement is roughly the same as it is intended to be intended to be on the basemap.
Add a plane into the scene and make sure it is at center of the scene. I usually scale it larger, for the sole reason of dealing with numbers with less decimal spaces. It can be made larger by either adjusting measurements, scaling in object mode( after which I apply the scale for a clean model), or scale in edit mode.
Now apply material and name it basemap and apply either the ready made basemap or the rough layout texture.
From top view, add floor reference image as an reference image, and align it to the rough layout texture and hide the basemap from view.
2. STARTING THE MODEL
Start by creating the floor plane, begin with the area that is not aligned straight, rotate the plane in object mode, by doing so, there will be a local transform embedded into the object, it will make things easier later on (Do not extrude it thicker, if the z fighting makes it necessary that it can be done later, when the modelling is complete, the reason being that all cutting and editing operations are easier to do with a plane ), name it.
Select the border edge, extrude it, separate it into a new object, name it outer wall or (OW), clear out subdivisions for a lighter model.
Add solidify modifier( No need to apply it), and make sure the direction of thickness goes outward and even thickness is checked.
3. CREATING INNER WALLS
Select Outer wall, duplicate a face, and separate it into a new object, name it Inner wall or IW.
Adjust the modifier settings and object height for variety within the model (optional).
From top view and transparency on, select the vertices and extrude them to create corners.
For visibility, you can select edges and mark them sharp.
NB! Make sure that corner combines only two faces, for the solidify modifier to work smoothly.
Duplicate faces in edit mode for additional walls.
Make sure the walls align properly, by using snap settings and limiting transforms to global or local axis.
Make sure the solidify modifier thickness direction is consistent, change face normals (Alt+N) if not.
4. ORGANIZING SCENE
Create a new collection and name it Floor_0 or something of similar nature.
Select basemap mesh, outer wall, floor mesh, and inner walls and add them to the collection by manually dragging them there in the outliner, or by pressing M in the active view.
Create a new collection and name it reference, add reference image into that collection.
5. MAKING DOORS AND OPENINGS
Select the object (Inner wall or outer wall) and in edit mode use loop cut (Ctrl+R) to divide polygon where necessary, and use edge slide or regular transforming to move it to the right place.
Delete the polygon from between said edges.
With solidify modifier active and not applied, the new door opening will not affect the thickness of wall.
6. STAIRS AND ELEVATORS
No limitations besides low poly count.
Easiest way to populate the scene with stairs, elevators and escalators in to finalize one and then duplicate it.
Therefore make sure that the model is to your liking, it has material applied and when using textures, make sure the object has UV’s.
Add a collection into the floor_0 master collection and name it accordingly (stairs, elevators, escalators).
Make sure the object is within the collection, then duplicate it in object mode, use reference to place them.
7. NEW FLOOR
In the outliner, right click on the floor_0 collection and duplicate it, rename the duplicate into Floor_1 and for clarity I recommend to rename other collection within that as well.
In the outliner right click on the duplicated collection and select hierarchy.
Move it up on the z- axis so that the new floor sits directly atop the lower floor. It can be done either by constraining movement on the z axis and using snap settings, or by constraining movement to z axis and inputting the height of the object „Outer wall“( if you do not remember it then select the outer wall on the floor_0, go to edit mode and for example select one of the upper horizontal edges. Press N and look for the global position of the z axis).
Toggle of the visibility of floor_0 collection in the outliner and select the reference plane, select its object data properties panel and change the reference image from floor_0 to floor_1, if you set up the folders properly than the image should be in the same place.
Make the necessary changes and rebuild what must be rebuilt.
For example cutting in the openings for stairs and escalators etc. If quad topology was maintained then loop cuts work well.
Repeat for other floors.
8. EXPORTING
If the scene is organized then everything should be in right collections.
In the outliner, right click on the floor master collection (floor_0, floor_1…) and select hierarchy.
With the selection active, go to „file“, „export“ and then choose FBX format.
Check the box on „Selected objects“ and change scale value to 0.1.
Create a new folder into the folder system, name it export and add the date of export into the name. Whenever changes are made, create a new folder for the exported files.
Name the file and repeat with other floors.
When its necessary to share the whole project, pack all external data into the blender file from „File“, „External Data“.
Then zip and send the master folder of the whole project.
9. CREATING UV’S WITH MATCHED SCALE
Select floor meshes from all floor collections and isolate them with Shft+H (Alt+H to make everything visible again).
With active selection go to edit mode and make sure all faces are selected.
Open up UV editor split view and in 3D viewport go to top view.
With the selection active, press U while in viewport and select „project from view“.
Select and scale the UV’s if necessary.
In case textures need to be custom made in a another software, select one floor mesh, go to edit mode and select the faces in UV editor and export out the UV layout, it can be used for precise texturing. Repeat with other floors.
10. CLEANUP
Add a large cube to the scene and make sure it is in the overall scene collection, not in one of the floor collections.
Make sure all collections and objects are visible.
Select the cube and assign one of the dud duplicate materials to it.
With the cube selected, press Shft+L and select material, that selects all all objects with that material on it, press Shft+H to isolate selection.
Now apply the correct material to the cube.
Select all the objects with the dud duplicate material and then add cube to the selection, press Ctrl+L and select material. The last object in selection determines the material.
Number of material channels and their order is of importance in that operation. If objects with dud duplicates have multiple material channels and Cube has only one, then it changes only the first channel of the objects, if the cube has two then it changes two channels in the same order. Therefore if every object has only one channel, then it works smoothly, but if there are multiple channels and the dud duplicates are not in the same order then it requires some further steps- But in this case it is easier to change the dud duplicates manually on each object, after the selection step (step 4 of this tutorial).
When the changes are made, delete the cube.
On the top ribbon of outliner, navigate to „Orphan data“ and then click Purge.
Now duplicates have been removed from the scene.
As always we are pleased to help you for creating a wayfinding solution for you or your customer. If you like us to make the maps, please also look our floorplan campaign and don’t hesitate to contact us.