WordPress Indoor Map Plugin

November 11, 2020

WordPress Indoor Map Plugin for indoor maps is an easy way to integrate building directory to your WordPress website. Keep the tenant info in sync on all your channels – web, mobile and kiosk. It allows you to connect locations on map with WordPress pages, show logos and additional info.

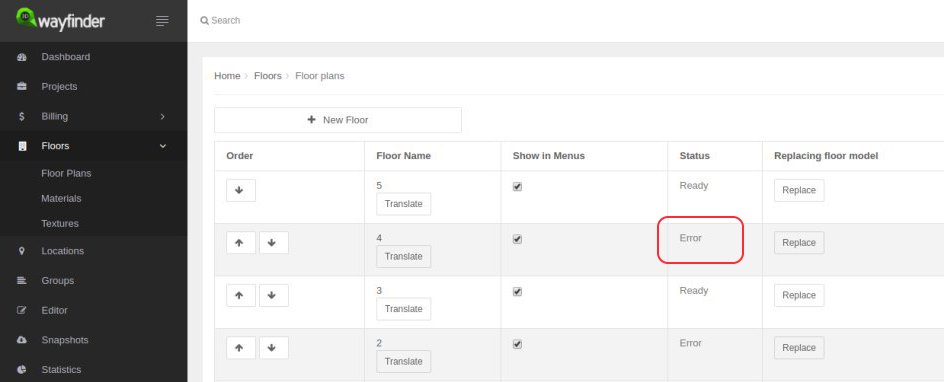
We have developed WordPress indoor map plugin for 3D Wayfinder. Plugin comes with stand-alone location management, but in can be used also with directory content from 3D Wayfinder.

Wordpress embedded map with locations and search

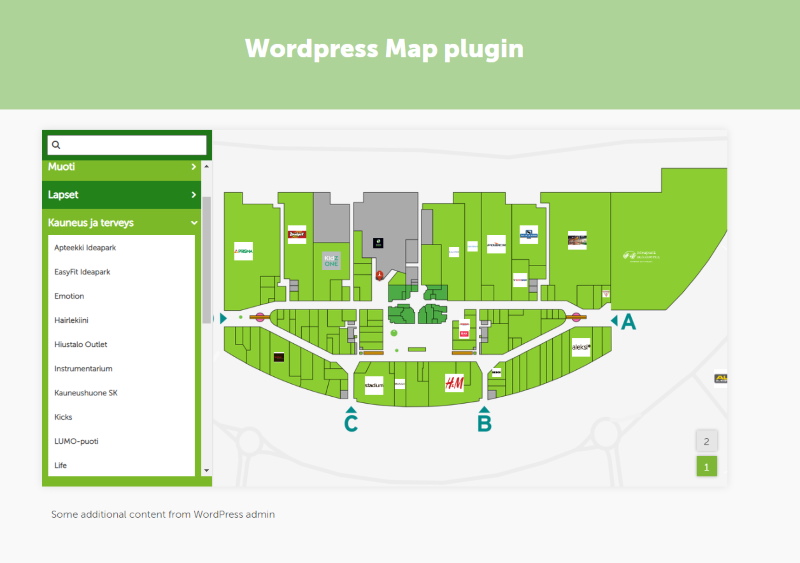
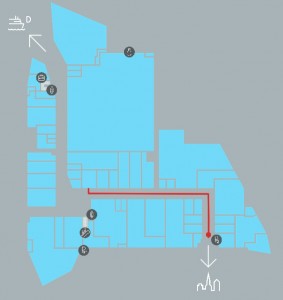
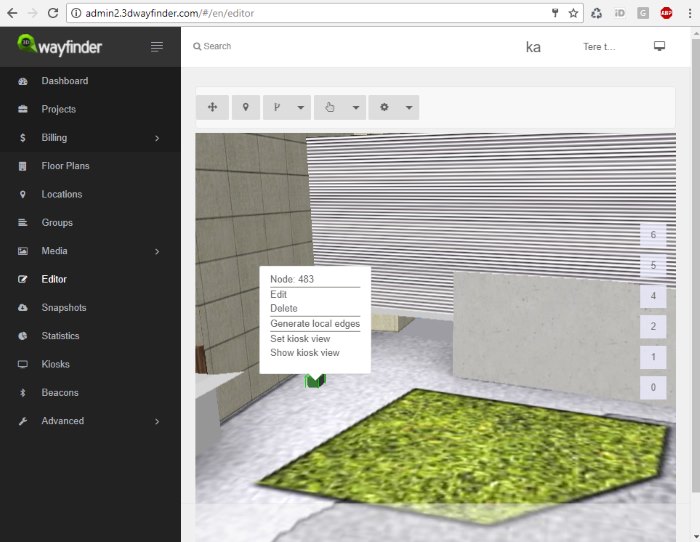
Plugin provides map, that can be included in any WordPress page. Besides interactive map, there are also search and browsing features. Floorplans are clickable, and it is also possible to link WordPress pages with map. This is a very useful plugin for all shopping malls, universities, airports, train stations and other similar institutions. The customer can open the 3D wayfinder map from their own device and click and move as needed.

Until the end of December we are offering WordPress Map plugin for $750 (one time fee, no monthly costs).

Named offer stands for all webpages on WordPress platform (we have done integrations with other CMS-software also, contact us about other options). 

The plugin is not yet listed in WordPress plugin directory, but it will be soon. we are working on adding simple 2D floor plan editor, so maps can be designed directly inside WordPress.


« »

New Improvements for 2D Floor Plans

January 30, 2018

We have added a couple of improvements for 2D floor plans, that make uploading 2D floor plan images easier. We are also working on couple of new features. That will make using 2D maps much easier.

3D and 2D maps share the same data in 3D Wayfinder. This is for using 3D and 2D side by side.

As 2D maps will be shown in 3D Wayfinder editor as textures on a plain. There are couple of requirements that have to be filled, like texture shape and size.

2D floor plans

Now we have added automatic texture resizing. So 2D map images don’t need to be square-shaped anymore. The longest side should still be at least 1024 pixels, if its less, the map will be resized to this value.

We will also resize the map to the closest larger power of two when none of the sides is 1024, 2048 or 4096 pixels. The ratio between the sides will stay the same so the map image will not be distorted after resizing.

We require the longest side to be 1024 pixels. But if you want to have a large and good quality map, then uploading an image with 4096 pixel side is a way to go.

Shopping center 2D floor map.

2D floor plans are a good start for wayfinding solution since they often already exist, so no extra effort goes into creating a map.

Right now our system allows uploading only raster files like PNG or JPG. Soon we will add new feature which enables uploading vector files like SVG. This means that maps could be zoomed in as much as needed and areas can be made clickable automatically.

We are also working towards the goal that 2D and 3D maps wouldn’t need separate templates anymore. It can be specified in the settings if you want to use the map as 2D or 3D.

This means that in the future it will also be possible to use both maps at the same time. 2D in mobile and 3D in kiosks.

« »

3D Model Converting Problems Partially Fixed

November 8, 2017

In recent days, we were having problems with 3D model converter. These problems are partially fixed now, so converting non-corrupted 3D files shouldn’t cause any interruption anymore.

3D Wayfinder’s model file converter has stopped quite often lately, when converting corrupted 3D floor-plan files. Every time converter stopped, we had to start the process manually and clean the converting queue.
All 3D files are converted to JSON format, so they can be load in 3D Wayfinder. Our converter supports many 3D file formats, most common are FBX and DAE.
The problems were with couple of models, that caused invalid JSON when converting.
We have added error catching for this, so the rest of the converting process can resume and these corrupted models don’t interrupt other 3D models to be converted.
If converting of 3D floorplan model fails, you’ll get “ERROR” response in 3D Wayfinder Administration:

3D_model_converting_error

Other reasons, that 3D files couldn’t be converted are mainly caused by using non-UTF characters in mesh names.

« »

Wayfinder With Digital Signage Software

November 2, 2017

We have tested 3D Wayfinder integration with Digitalsignage.com software. Integrating wayfinding with digital signage media management gives additional purpose for advertising screens.

DigitalSignage.com is created by MediaSignage Inc. It is free digital signage software. Including signage player and media content management. Their software is used in over 200 countries. Since the first release, the software has been installed on hundreds of thousands of PCs.

DigitalSignage.com software is web-based. So it is really easy to use 3D Wayfinder as a part of the media player screen layout. Let’s say, that there are top and bottom advertisement banners on the portrait screen and wayfinding application is set-up on the middle of screen.

Wayfinder kiosk

Screensaver mode

More advanced integration is switching advertisements with wayfinding application. This is something, we call “screensaver mode” when creating layouts for 3D Wayfinder. With Digital Signage software the simple way is to switch between wayfinding and advertising screen. Digital signage itself lets you create switching timelines, channels and content. We do not go into that much. Because there are plenty of examples in their documentation.

More sophisticated way to change between 2D map and screensaver can accomplish with event and triggers. Under Digitalsignage.com documentation http://docs.digitalsignage.com/ look for remote values. It describes what should be include in your app to be able to send event to their server.

Two functions that are important in 3D Wayfinder events case are ‘onSessionStart’ and ‘onSessionEnd’. They both are used by our statistics module. But if you do not have any need for statistics then you could overwrite these functions.

With signage free version you can use our 2D map with ease. Just include HTML component into your campaign and add link to your project.

digital signage

From documentation we could find out that signage players HTML component does not support webgl. But according to docs we should be able to get out 3D maps working with Browser component and signage player should be working on windows machine. Browser component is available for enterprise users.

« »

Keeping Floor Plan Editor Idle in the Background

August 1, 2017

The new 3D Wayfinder Administration Panel is centered more around the floor plan editor. To provide better usability we keep the 3D editor idle when moving away to other pages. So switching between editor and other views is much faster now.

The new Administration Panel has been publicly available for testing since the beginning of this year. At the end of the summer we will only support the new administration panel. Although the current administration environment will be available for some time.

Loading the 3D floor plan editor takes a couple of seconds because we need to load 3D floor-plans models and also additional editor tools. Now when the editor is always in the background. We do not need to load the 3D editor again. This makes the usage more faster and user friendly.

new 3D floorplan editor

Our new administrator panel is being built on Angularjs. To achieve loading of editor once we have created the service that holds the canvas element. It is also attached our editor API to it. Controller then adds canvas to the editor view and provides connection to API actions.

To see and test new Administration panel and floor plan editor, please log in here. If you don’t have an account with 3D Wayfinder, you can create it here for free.

« »

Wayfinding Kiosk with Raspberry Pi

July 11, 2017

We have recently experimented with a Raspberry Pi 3 Model B, to see how it can work as media player for digital signage display or wayfinding information kiosk. As a result we can say, it works well with 2D wayfinding maps and with 3D Wayfinder Advertisement Module.

What is Raspberry Pi?

Raspberry Pi is a small credit card sized linux based open source computer. It is equipped with:
– Broadcom 64-bit quad core CPU clocked @ 1.2 GHz,
– 1GB of RAM,
– built-in WLAN and BLE modules,
– HDMI output.

But everything is soldered to the board hence there is no option to upgrade, except for the microSD card. You can also have a nice box for it, so it doesn’t look like a hackers development board.

Raspberry Pi

Compared to other small form factor computers like Intel NUC or Gigabyte BRIX, it is much cheaper. Raspberry Pi with a nice case and microSD card would cost about 50..70 USD. The NUC or BRIX boxes start at 110..130 USD new, and you still need to equip them with a hard drive (SSD/HDD) and memory module(s) (DDR3/DDR4 SO-DIMM RAM) which would cost you about an extra 30 USD for a 32GB SSD and ~25 USD for DDR3 or ~30 USD for DDR4. Totalling up to about 165..190 USD.

Raspberry PI plays in Full HD, so it is not a problem to use large resolution screens.

Wayfinding with Raspberry Pi

Enable WebGL

For 3D the Raspberry is still a bit weak and by default it doesn’t have WebGL enabled. To enable WebGL you have to:
1. Open up the terminal application (or command prompt if you prefer to call it that)
2. run command sudo raspi-config
3. navigate to Advanced Options
4. enable GL support.

The GPU on the Raspberry PI 3 Model B doesn’t support floating point textures, so we cannot use transparent textures.

To build wayfinding or digital signage project based on Raspberry Pi you need to use a special linux distribution that opens a browser in full-screen mode instead of the regular desktop interface.

At the same time the kiosk based on Raspberry Pi is quite bullet-proof. There’s no need to worry about excessive power consumption as it actually only consumes about 3.7W under full load and only about 1.4W when playing a FullHD video, which is roughly 10% of the Intel NUCs ~38W while under full system load and ~18W while watching a FullHD video.

chart

It boots up fast from a microSD card which can be easily replaced when it wears out or breaks.

Although remote managing a kiosk that uses a Raspberry Pi can prove to be quite a cumbersome task as you cannot use regular GUI remote management tools like Teamviewer or LogMeIn. The fastest way to remote manage the Raspberry Pi is to use SSH, which is a CLI (Command Line Interface) and this might scare-off most of the users that are not used to poking around via a CLI.

« »

Showing Multiple Floors in Path Animation

March 20, 2017

New feature we have added for wayfinding applications is accordion style floors when using path animation. This means, that all floors will be visible on the screens when showing the path through multiple floors.

In 3D Wayfinder you will see all floors as they exist in real building, so they are just simplified 3D models of the real floor-plans. When switching between floors, new floors will drop into scene on top of the previous floors or fly away, if going downward with the path. All floors are exactly covering previous ones, so basically whole 3D building models are sliced by floors.

Now it is possible to keep the floor plans apart from each other, so you can see all floors at the same time. This is useful mainly for wayfinding, so it is easy to remember the whole route. But we will definitely develop this “accordion” mode further, so it can be used also in other applications. For example in BIM applications, it is possible to highlight objects in all floors at the same time. Or visualize the whole factory with multiple floors or create multi-layer metro station animations.

Animation_floor_animation_in_3D_wayfinder_optimize

Currently the distance between floors is configured under settings. In future we will add features for separating the floors by dragging the floor-buttons apart. This makes the browsing of 3D buildings much more flexible.

To use this accordion style path animation, go to Settings in Administration panel. Then find Path->3D->Leave a offset between floors. For example use 50 as an offset, and then see how it looks.

« »

Request for a 3D Wayfinder Demo

October 27, 2016

Our sales team can help You to find the best wayfinding solution for You or Your customer. We can help You with creating 3D floorplans, designing a custom template and integrating wayfinding with other software. Now you can request for a 3D Wayfinder demo. 

We have made getting to know our software and our projects even easier for you than before. You can now find the request for a 3D Wayfinder demo button on our homepage.

Exploring 3D Wayfinder with your own resources is the most common way of getting to know our software. But it is even simpler if you ask for a demo and can have an interactive conversation with our people to clear out all the details of your floor plans creation needs and wayfinder requirements.

We will show you the basics you need to get started and will answer all of your questions about the software. During the demo we can also discuss any custom solutions and requests you might have.

Request for a 3D Wayfinder demo

« »

Portals in Wayfinding Software

May 25, 2016

We have implemented new type of nodes – portals. This makes it possible to guide visitors instantly from one point to another.

Portals in wayfinding software can be used for creating an instant path between a large number of floors or when floors are drawn on the same map as shown in the image below.

Portals_in_wayfinding_software

In the case where a building has a large number of floors the portal nodes become exceptionally useful they allow the path to “jump” instantly from one floor to another making the path visualization instant.
The portal nodes are useful in the case where there is a greater distance between locations where you don’t need to show the way. For example in the case when using a train or a tunnel in between locations.

The nodes operate the same way as in the popular videogame Portal. The main idea is that you can create two gateways in between which the path can move freely either way.

Currently the portal nodes only operate on 2D maps, but at the moment we are working on developing portal nodes for 3D maps. They will be available soon to make your wayfinding solutions even more flexible.

« »

3D Interactive Floor Plan Demo

September 8, 2015

Check out our new 3D Wayfinder platform demo. This will give you short overview of what you can do with 3D Wayfinder and what are our API capabilities.

The demo has following topics:

  1. Moving 3D map with mouse cursor or touch screen.
  2. Clicking on the map and getting location name and description.
  3. Changing floors of the building.
  4. Showing path between 2 locations.

Demo is accessible from the 3D wayfinder home page and can be opened also from this link:

[xyz-ihs snippet=”3D-demo”]

Demo is based on following javascript code. You are welcome to use it in your projects, your HTML should contain canvas with ID “map”. For more info please see 3D Wayfinder embedding tutorial.

var wayfinder;
var map;
var mapContainer;
var poiInfo;
var tutorialArea;
var currentStep = 0;
var STEPCOUNT = 3;
var originals = {};
var floors = {};

function mapResize(){
	if(wayfinder){
		cont = mapContainer.find(".map-area");
		map.attr("width", cont.css("width"));
		map.attr("height", cont.css("height"));
		wayfinder.resize();
	}
}

function runDemo(){
	map = $('#map');
	poiInfo = mapContainer.find("#poiInfo");
	tutorialArea = mapContainer.find(".tutorial-box");
	wayfinder = new Wayfinder3D();
	wayfinder.options.assetsLocation = '//static.3dwayfinder.com/shared/';
	wayfinder.open("1a07bdc53edb3828f390bc9af7281585");
	setTimeout(mapResize, 150);

	wayfinder.cbOnProgress = function(percentage){
		$("#progression").css('width', percentage * 100+'%');
	};

	wayfinder.cbOnDataLoaded = function(){
	    mapContainer.find(".loading-screen").hide(100);
	};

	wayfinder.cbOnMapReady = function(){
		removeAllFunctionality();
		setText(0);
		stepTutorialButtons(0);
	};
}

function stepTutorialButtons(step) {
	var prev = tutorialArea.find(".tutorial-prev");
	var next = tutorialArea.find(".tutorial-next");

	if (prev.text() && step === 0)
		prev.text("").off("click").css("cursor", "auto");
	else if (!(prev.text()) && step !== 0)
		prev.text("<").click(previousStep).css("cursor", "pointer");

	if (next.text() && step === STEPCOUNT)
		next.text("").off("click").css("cursor", "auto");
	else if (!(next.text()) && step !== STEPCOUNT)
		next.text(">").click(nextStep).css("cursor", "pointer");
}

function removeAllFunctionality() {
	if (wayfinder) {
		if (wayfinder.poiController) {
			originals.onPOIClick = wayfinder.poiController.onPOIClick;
			wayfinder.poiController.onPOIClick = function(poi, position, event) {};
		}
		originals.cbOnPOIClick = wayfinder.cbOnPOIClick;
		wayfinder.cbOnPOIClick = function(poi) {};
	}
}

function setText(step) {
	var keep = tutorialArea.find(".tutorial-text").find(".keep");
	if (keep.length)
		keep = keep.detach();
	switch (step) {
		case 0:
			tutorialArea.find(".tutorial-text").text("Click and drag on the map to move or rotate.");
			break;

		case 1:
			tutorialArea.find(".tutorial-text").text("Click on a location for more info.");
			break;

		case 2:
			tutorialArea.find(".tutorial-text").text("Click on a button to show that floor.");
			break;

		case 3:
			tutorialArea.find(".tutorial-text").text("Click on the button to show the path between two random locations.");
			break;

		default:
			break;
	}
	if (keep.length)
		tutorialArea.find(".tutorial-text").append(keep);
	stepTutorialButtons(step);
}

function addFunctionality(step) {
	switch (step) {
		case 1:
			if (wayfinder && wayfinder.poiController) {
				wayfinder.poiController.onPOIClick = originals.onPOIClick;
				wayfinder.cbOnPOIClick = function(poi) {
					poiInfo.show(100);
					poiInfo.find(".title").text(poi.getName("en"));
					var poiDescription = poi.getDescription("en");
					if (poiDescription)
						poiInfo.find(".description").text(poi.getDescription("en"));
					else
						poiInfo.find(".description").text("");
				};
			}
			break;

		case 2:
			poiInfo.hide(100);
			poiInfo.find(".title").text("");
			poiInfo.find(".description").text("");

			if (wayfinder) {
				var showFloor = function() {
					var f = $(this).attr("data-floor");
					if (f in floors)
						wayfinder.showFloor(floors[f]);
				};
				var fs = wayfinder.building.getFloors();
				tutorialArea.find(".tutorial-text").html("<div class='keep'></div>");
				var floorsMenu = tutorialArea.find(".tutorial-text").find(".keep");
				for (var i in fs) {
					if (fs[i] && fs[i].showInMenu) {
						floors[i] = fs[i];
						var button = $("<button data-floor='"+i+"'>"+fs[i].getName("en")+"</button>").click(showFloor);
						floorsMenu.append(button);
					}
				}
			}
			break;

		case 3:
			if (wayfinder && wayfinder.logic) {
				var randomPath = function(times) {
					if (typeof times !== 'number')
						times = 1;
					if (times > 9)
						return;
					var poiList = wayfinder.pois;
					var poiIDs = [];
					for (var i in poiList) {
						poiIDs.push(i);
					}
					var rand1, rand2;
					while (!rand1 || !(poiList[rand1].getNode())) {
						rand1 = rand2 = poiIDs[Math.floor(Math.random() * poiIDs.length)];
					}
					while (rand2 == rand1 || !(poiList[rand2].getNode())) {
						rand2 = poiIDs[Math.floor(Math.random() * poiIDs.length)];
					}
					rand1 = poiList[rand1].getNode();
					rand2 = poiList[rand2].getNode();
					try {
						wayfinder.logic.showPath(rand1.id, rand2.id);
					}
					catch (e) {
						// Try again
						randomPath(times + 1);
					}
				};
				tutorialArea.find(".tutorial-text").html("<div class='keep'></div>");
				var area = tutorialArea.find(".tutorial-text").find(".keep");
				var pathButton = $("<button>Show random path</button>").click(randomPath);
				area.append(pathButton);
			}
			break;

		default:
			break;
	}
}

function removeFunctionality(step) {
	switch (step) {
		case 1:
			if (wayfinder && wayfinder.poiController) {
				wayfinder.poiController.clearHighlights();
				poiInfo.hide(100);
				poiInfo.find(".title").text("");
				poiInfo.find(".description").text("");
				wayfinder.poiController.onPOIClick = function(poi, position, event) {};
				wayfinder.cbOnPOIClick = function(poi) {};
			}
			break;

		case 2:
			tutorialArea.find(".tutorial-text").find(".keep").remove();
			break;

		case 3:
			addFunctionality(2);
			break;

		default:
			break;
	}
}

function previousStep() {
	if (currentStep === 0)
		return;
	removeFunctionality(currentStep);
	currentStep--;
	setText(currentStep);
}

function nextStep() {
	if (currentStep === STEPCOUNT)
		return;
	currentStep++;
	addFunctionality(currentStep);
	setText(currentStep);
}

$(function(){
	mapContainer = $("#demoMap");
	$(".home-video").click(function () {
		mapContainer.show(100);

		if(!wayfinder)
			runDemo();
		else
			wayfinder.engine.run();

		$(window).resize(mapResize);
	});
});

« »