We have added CDN support in 3D Wayfinder. CDN makes loading 3D Wayfinder application faster especially outside Europe. Currently it is available only for custom projects, but soon it will be option for all 3D Wayfinder customers.
CDN or Content Delivery Network is a geographically distribute servers that cache content close to end users. A CDN allows for the quick transfer of files, media etc. It works best for static content. In 3D Wayfinder it is basically possible to load all wayfinding content including maps, location data, images, application files etc. CDN is widely used by sites with huge traffic like Facebook, Netflix, and Amazon.
CDN is currenlty available for 3D Wayfinder custom projects and we have to make manual changes to make it work. We would like to open it for all 3D Wayfinder users, but this will still need some development and testing.
CDN server network copies files to more than 200 locations over world and when the wayfinding application is load, the files will be served from closest server.
During the testings we got loading improvement more than 60%. Lodaing speed was around 6 seconds from CDN compare to 16 seconds from 3D Wayfinder server.
Delivering content over CDN needs static content. This means that the content from databases has to be cached first. For any live-data like positioning or statistics, CDN cannot use. As wayfinding maps don’t change that often, it is easy to make the location information and maps to be as static content. Just after every change in 3D Wayfinder administration panel, the content has to be submit to CDN network also.
If you are already 3D Wayfinder customer and like your wayfinding to be load over CDN, please contact our sales department or your contact person in 3D Wayfinder. We will keep you posted through our blog and let you know when CDN-option will be available for all users in administration panel.
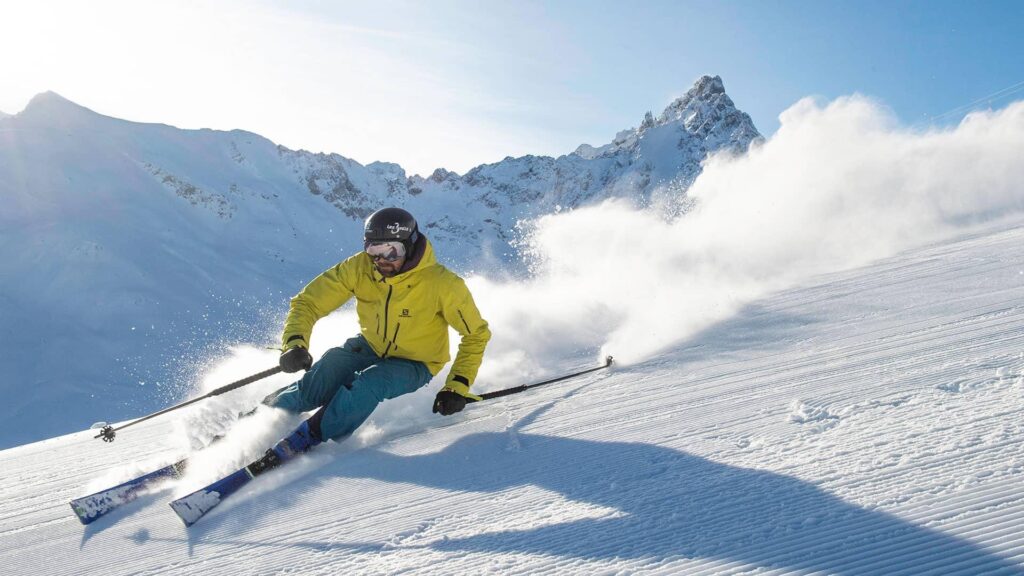
3D Wayfinder gives you innovative 3D map platform where you can build best ski resort app. All needed functions are available: 3D maps, positioning, guidance, search, filtering ski tracks and much more.
Alpine skiing is fun and many people love it. It is more than just taking the lift up and skiing down to the ski lift entrance again. Skiing is active vacation with everything it should include: planning trips, taking meals, socializing etc. You can plan your ski-routes as the longest ski tracks can be more than 10 kilometers long in Alpine region. While skiing down the hills you can enjoy the sun, have a drink in cafeterias and enjoy the social life.
There has been worries that ski resorts have less snow and the season periods of the ski resorts (when the ski-tracks can be opened) is decreasing. Weather it is temporary phenomenon or climate change is a different topics, but what we know is that ski resorts have to use modern technologies too. This is for providing better experience for all the skiers and snowboarders and manage the communication with visitors.
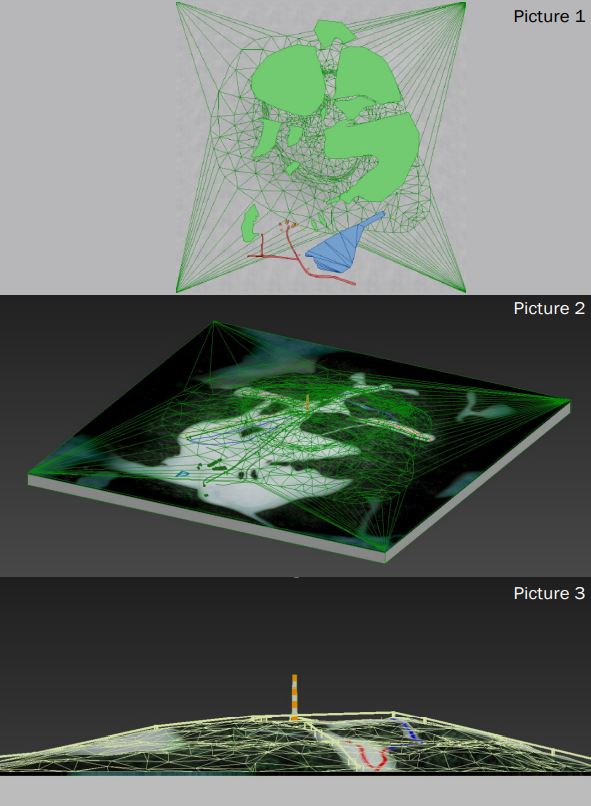
3D maps can be very detailed because ski hill, ski tracks, lifts and objects like forests and buildings can be added. The picture shows complexity of creating 3D maps based on regular height-maps. Later there will be added ski trails, trees, houses and lifts as 3D models.
To estimate the work for modelling 3D maps of the ski tracks, please contact our sales.
3D Wayfinder for ski-resorts can be accessed in different ways. 3D Wayfinder can be used in touch-screen kiosks. These can be weatherproof screens near lifts or entrances, or simple information kiosks near hotel receptions. Interactive 3D maps are certainly more advanced way to browse ski tracks than 2D drawings, we have mostly seen. 3D Wayfinder can be integrated to the website or used as web-based app. Printed signs or labels can use QR-codes to open 3D Wayfinder with the 3D map of the mountain or ski resort.
Positioning
3D Wayfinder uses Bluetooth beacons for indoor positioning as the GPS signal is weak inside the buildings. Positioning in ski resorts is much simpler as we can use regular GPS positioning. The mobile application (or web application) positions the user according to the GPS signal and will let user navigate from point A to point B. For alpine skiing, positioning allows user to see the the location so that he or she can see the tracks and find the nearest cafeterias or toilets or find the ski lift to another hill.
Application services in ski resort
3D Wayfinder offers several different options for creating a ski resort app. It is also possible to add several different services to the application. The system can be integrated with many other systems. In the application, it is possible to buy e-tickets using QR-code. In addition, you can mark the gathering places of groups anywhere on the mountain and sharing meeting point in messenger. It allow to plan your journey on mountain and select ski tracks based on your level and skills.
For large mountains there is possible to add help button. If in trouble or if user need of help from ski resort staff or emergency services. User just pushes one button and their location information with help signal is sent!
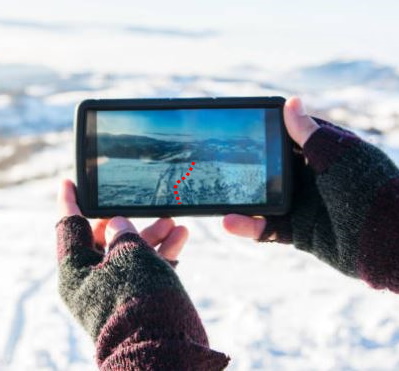
Also you can use the first person view solution, which is essentially a 3D replay from descending from ski mountain. To share on social media or keep as a memory.
3D Maps and First-Person-View
In ski resorts and mountains, it is important to use 3D maps. This is because you cannot see the other side of the mountain in 2D map, but in the ski hills it is important to see the other side of the mountain where you want to go as the tracks are usually not only in one side.
First-Person-View is the term from computer games. It means you will see the game through players’ eyes. By looking the route with First-Person-View, you see how it might feels to ski down the hills in real life. It is like simulation of the skiing, so why not to go through the planned tracks by looking route in 3D.
As the main land-marks on ski resorts can be modelled out in 3D, for ski lifts and tracks we can use vectors. This means that zooming out the map, will not reduce the size of the vectors. The same way you will see important roads on map applications.
It is obvious that the economy is currently in a downward trend. More and more questions rise in this regard. How can we save money and energy? Globally, more and more people are talking about saving energy. This is definitely one place where different service companies could save. In addition to energy savings, financial savings are also important. By using the 3D Wayfinder software, it is also possible to save money quite realistically.
We have previously introduced you how to earn revenue with wayfinder software, in this post we will talk about how to save through the wayfinding software.
Certainly, many shopping center managers notice that purchasing power is decreasing. The global economic recession is mainly to blame for this. When the economy is booming, people shop more and spend more money. When the economy is down, people think more carefully about where they spend their money. Might be that some people even deliberately distance themselves from shopping malls so as not to make reckless spending.
Save on labor costs
The biggest cost savings comes from labor costs. Have you thought that there is an employee in your company or institution whose work could be done by some software? For example, there are often information workers in various office buildings, shopping centers or airports. What role do the employees at the information desk mainly play? Most of the time they guide people. People use information boards to find a way to store or special room. By using the 3D Wayfinder, it would be possible to save on the salary costs of one or even several information/help workers. This is probably one big and thought-provoking place where you can cut costs with wayfinding software.
Save money by reducing printed signs
In public buildings one of the administrative expenses is certainly different signs. Business signs must be changed when someone moves out or joins. 3D Wayfinder can also help here. Using wayfinding software reduces needs for different signs and printed floorplans. Building directories and maps can be digital and can be changed without the need for printing and changing physical signs. It is even possible to install digital screens in elevators.
Using digital wayfinding also helps to save on administrative costs. In addition, it is easier for the administrative manager of the building to change tenant or rental information in one place digitally than replacing installed physical signs.
Less energy with sleep mode
One of the ways to save energy is forcing wayfinding kiosks to go to sleep mode. Sleep mode is a widely known term and probably everyone who uses a computer or smartphone is familiar with it. It is possible that many 3D wayfinder customers may not know that sleep mode can also be set for wayfinding kiosks. When there is no activity in the building and the doors are locked, the wayfinding kiosk can also be in sleep mode.
Sleep mode can also be used when the building is open. The kiosk can be set in such a way that the screen is completely dark or, for example, with the text “Click here for building map” etc. when no one is using the kiosk. When a person touches the screen, the screen becomes active and can be used.
Save with dark mode
How else would it be possible to save with wayfinder software? One of the ways to save energy could also be using dark mode. At wayfinding kiosks, it is possible to set the screen light to be brighter and darker. Darker screen use less energy.
Landscape template normal bright version
Landscape template dark mode
The difference between the two images is quite large and can be startling when compared like this. In addition to saving energy, it is also better for the eyes. In any case, the customer receives the information in exactly the same way as if it were on a screen with full brightness.
3D Wayfinder offers the possibility to set the display of the kiosk in time. For example, it is possible to set the time when the screen goes into dark mode. It is also possible to set the screen based on the surrounding light. For example, if the lighting in the building is bright or the sun is shining, the screen will be brighter. If the lighting is darker, the screen will also automatically darken. Dark mode saving is easy way fot cut costs with wayfinding software.
There is also an option to use a different background color. You can choose the background colors for building maps in 3D Wayfinder. If you want to save energy, it would be wise to use a darker background. If the card has a darker background, it saves more energy because the screen doesn’t have to be so bright. Also, a darker background can sometimes work even better. On a darker background, it’s better to highlight some objects that don’t come out as smooth on a light background. This is an option that should be considered when starting to order a house manager or create one yourself.
Smart wayfinding
Do you know that 3D Wayfinder indoor positioning software using smart wayfinding technology?
Smart wayfinding is easy. The person who makes 3D Wayfinder map can choose how they want the path to be guided. For example, it is possible to guide the way that elevators are avoided. Moving the elevators up and down is probably also a big administrative expense. However, if people are guided so that they are directed to the stairs, it is possible to regulate the use of elevators.
3D Wayfinder supports energy saving. We support saving people’s time by providing innovative wayfinding software. We are environmentally friendly and recommend it to all our customers. If you are already using 3D Wayfinder you can change settings for saving energy or ask help from our team. If you are not yet using wayfinding software, then please contact our sales department. We will definitely find the best solution for you and help you cut costs with wayfinding software.
In this post, we will introduce different options for designing 3D map. A map mostly serves the task of guiding people, but there are many different ways to design a map. When designing a map, a lot depends on what the map is designed for, which people use it, what kind of user experience they expect and what added value the map should create.
Detailed designing of 3D model
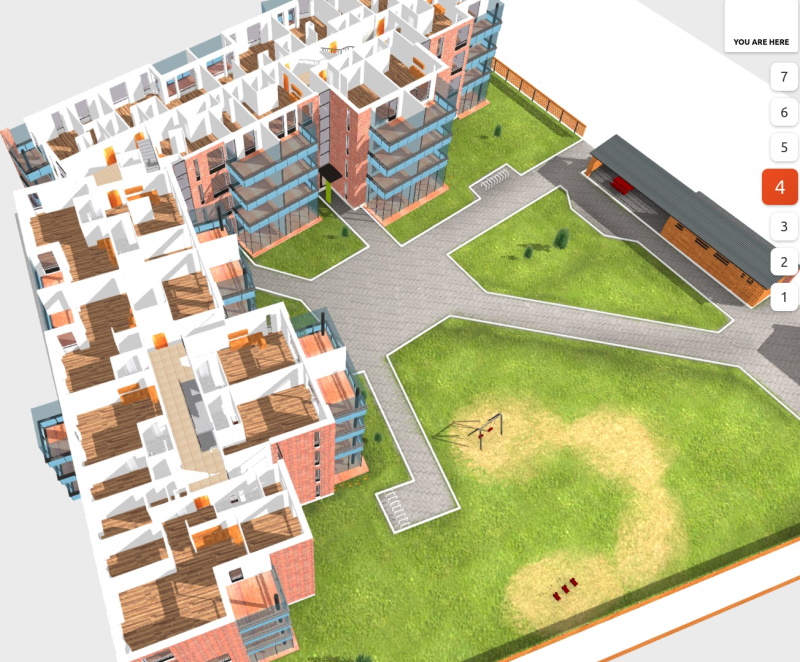
With 3D Wayfinder, you can design your own 3D map, but we also offer a complete solution with several detail levels. One way is to create very detailed designing 3D map. These are models where the textures are precise, so that it looks as real as possible. Such a 3D model is important for advertising apartment buildings, so future residents can get a very accurate idea of their home.
Detailed 3D model view of the apartment building and the courtyard
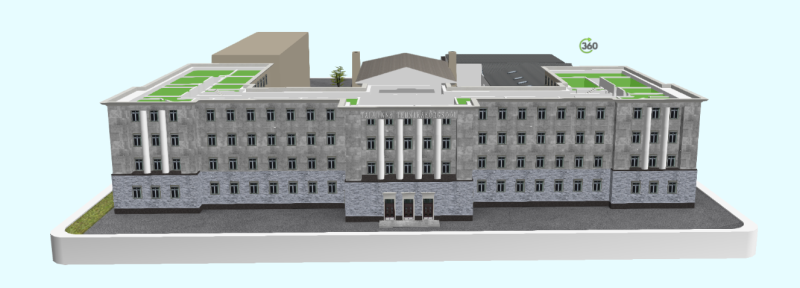
It is not always necessary to create detailed models for the purpose of selling houses or apartments. For example, the building of the University of Applied Sciences in Tallinn has historical value. They wanted to bring a historical feel to the 3D map as well. Therefore, a detailed and realistic model was created for them.
Tallinn University of Applied Sciences 3D model view of the main building
Funway 2D map
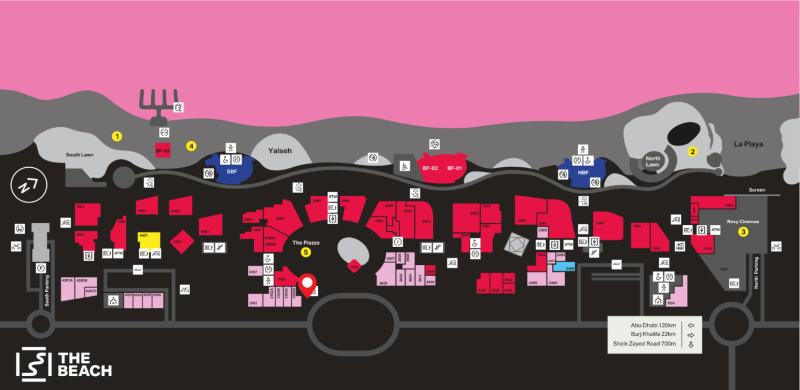
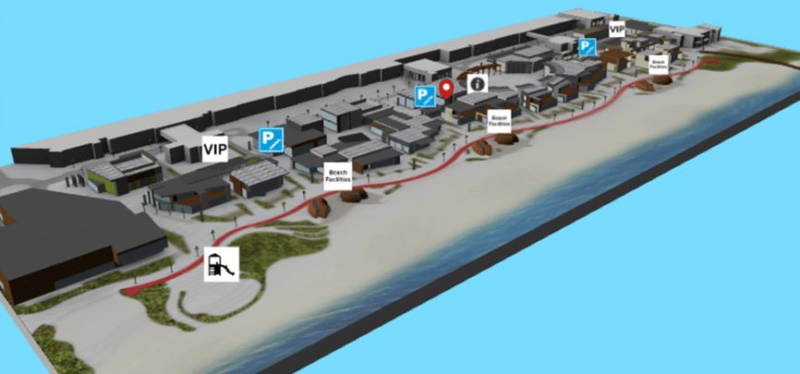
A complete opposite to the realistic models are 2D maps. This is a map drawn using the FunWay method, which does not convey a real image, but has a nice design and is understandable to all users.
2D map view of Beach Mall in Dubai
We have also prepared a detailed 3D model for them, which is much more realistic and the icons on the model are slightly more emphasized.
3D model view of Beach Mall in Dubai
Simplified map view
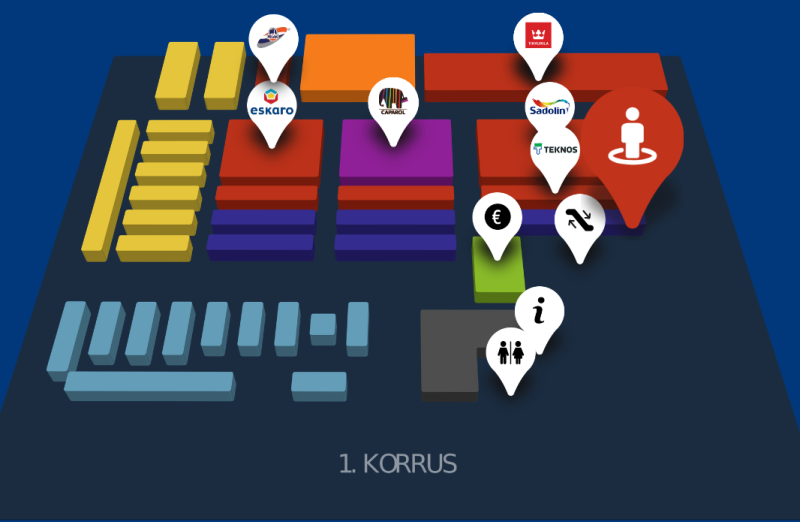
Everyone is probably familiar with the feeling of getting lost in a hardware store and spending time for lookinf certain products. We have prepared an interior map for the hardware store in Estonia, by shelves and departments. Pins for products from specific companies have been added to the shelves and departments, which makes it much easier for customers to search for specific products. Creating such a card is quick and easy. For customers, it makes the experience of visiting a hardware store more pleasant.
A simplified map view of the hardware store with product brands
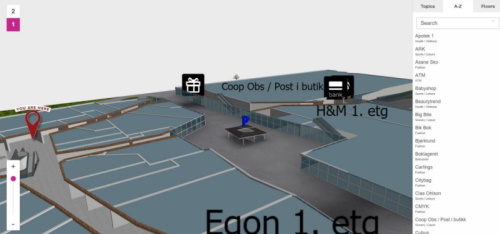
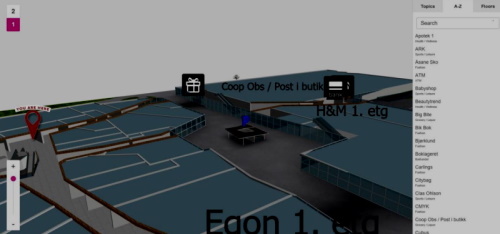
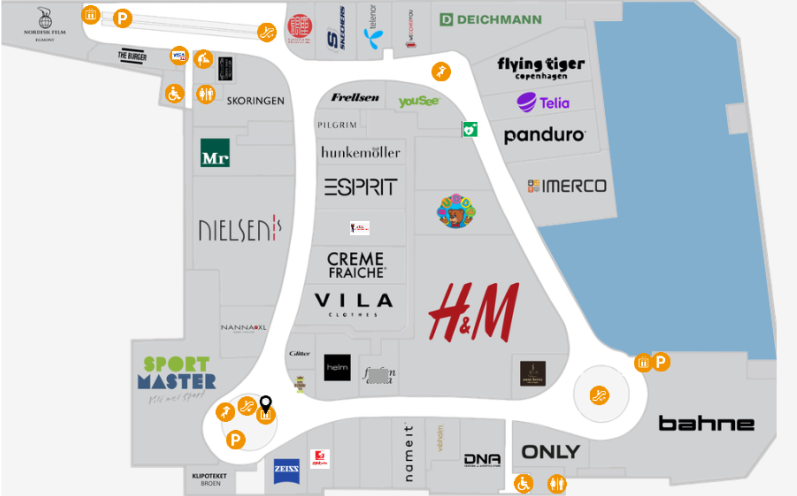
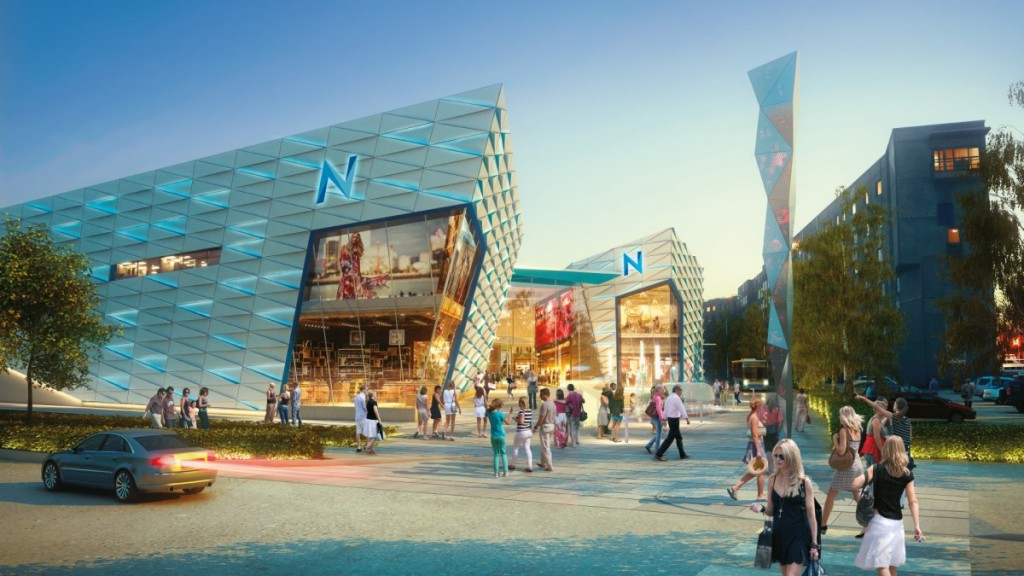
A similar simplified map is suitable for shopping centers, where different businesses can advertise themselves by the logo attached to the map, and it is much easier for the customer to find the desired location.
Wayfinder solution of a large shopping center in Denmark with logos
Color based design
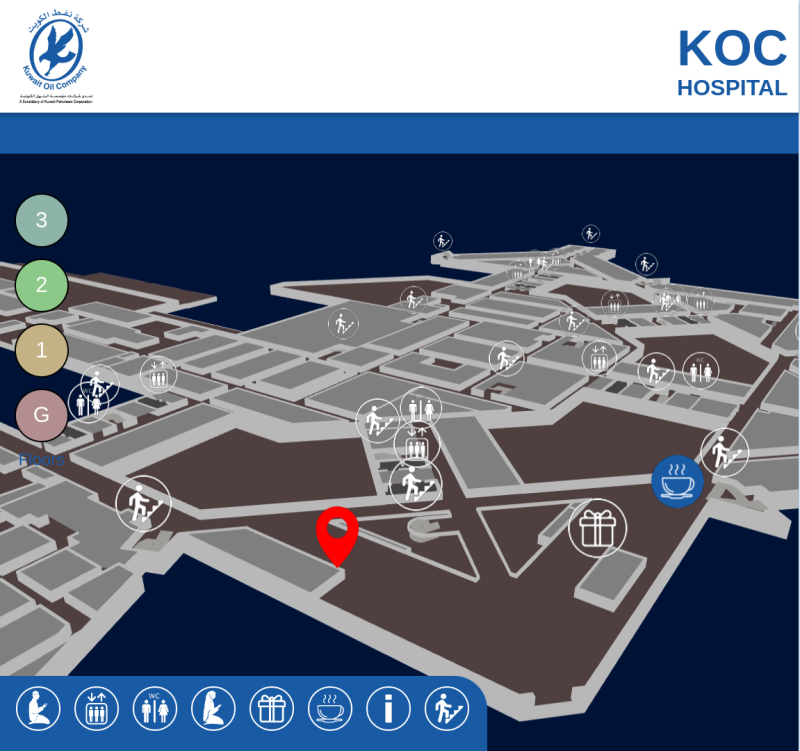
The designing 3D map can be based on the colors of the website or logo. For example the Kuwait Oil Company hospital map is inspired by the dark blue color of their website and logo.
Kuwait Oil Company Hospital Wayfinder map
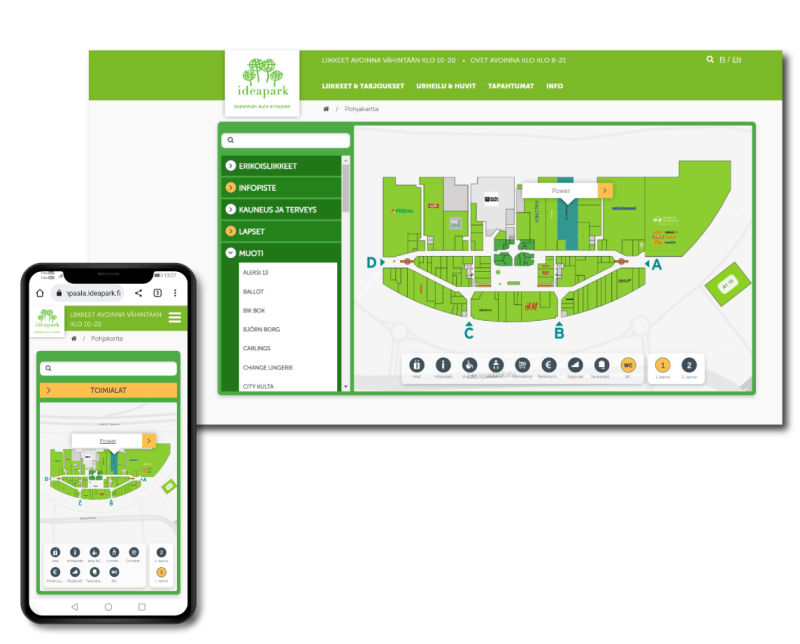
Similar to the color scheme of the Kuwait hospital, a map has also been created for IdeaPark based in Finland. The color scheme of the IdeaPark shopping center is green, and a map was made for them with the same color scheme.
Map solution for the IdeaPark shopping center in Finland with mobile integrations
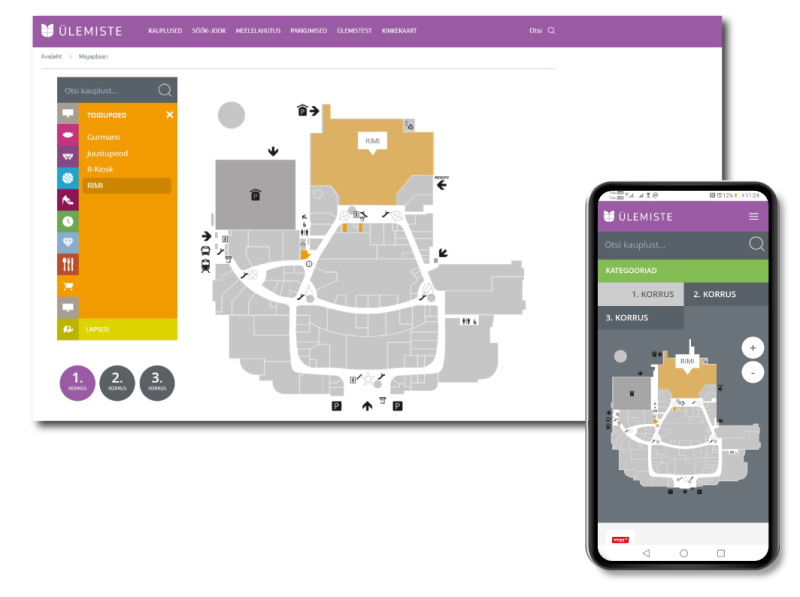
In addition to 3D models and maps, 3D Wayfinder also offers the option of creating a mobile app. The Ülemiste Center in Estonia has requested such a solution. Clients of the center can use the map application on a personal mobile device. The background of the Ülemiste Center mobile application map is displayed in a dark color to make it more visible on a small screen.
Map of the Ülemiste center with the solution of the app on the mobile device
As you have seen, 3D Wayfinder can design very unique looking maps. In addition to the big picture, there are many options for fine tuning. For example, it is possible to choose colors of the ceiling, floor, walls and other similar surfaces. It is also possible to change shapes and colors of the road guidance, shape and color of the adjacent menu and much more. All this affects the user experience and creates value for the branding of the building or company.
How are 3D map models made in Blender? Here is a step by step look.You find detailed blender modeling tutorial with videos and specific guidelines.
BLENDER MODELING TUTORIAL GENERAL GUIDELINES
Maintain a clean quad topology and keep poly count low, no need for edge beveling and subdivisions, when the situation does not require it.
The floor, outer walls, inner walls, details, locations, stairs, elevators, locations and greyed out areas must be separate objects, please do not combine them into one.
Its also recommended to group objects of the same kind and name them accordingly.
1. SETTING UP THE SCENE AND MODELLING REFERENCE
Before starting the model make sure you have references ready.
Create JPEG or PNG files from the reference DWG’s or pdf’s.
If the buildings have multiple floors, make sure that the images have the same dimensions and the floors align with each other.
1.1 SETTING UP THE SCENE
Start by setting up the folder system for the project and adding the reference images into this folder system, then prepare the scene for modelling by setting the units( make sure units are consistent throughout the project). We use SI units( metric units), usually meters.
Now you can either create the basemap itself first, based on the provided references or you can create a simple rough layout for the building placement and replace it with a basemap later, based on the provided DWG and pdf references. For following examples, I took the rough layout route. Make sure the rough layout texture has dimensions relative to the upcoming basemap and is placement is roughly the same as it is intended to be intended to be on the basemap.
Add a plane into the scene and make sure it is at center of the scene. I usually scale it larger, for the sole reason of dealing with numbers with less decimal spaces. It can be made larger by either adjusting measurements, scaling in object mode( after which I apply the scale for a clean model), or scale in edit mode.
Now apply material and name it basemap and apply either the ready made basemap or the rough layout texture.
From top view, add floor reference image as an reference image, and align it to the rough layout texture and hide the basemap from view.
2. STARTING THE MODEL
Start by creating the floor plane, begin with the area that is not aligned straight, rotate the plane in object mode, by doing so, there will be a local transform embedded into the object, it will make things easier later on (Do not extrude it thicker, if the z fighting makes it necessary that it can be done later, when the modelling is complete, the reason being that all cutting and editing operations are easier to do with a plane ), name it.
Select the border edge, extrude it, separate it into a new object, name it outer wall or (OW), clear out subdivisions for a lighter model.
Add solidify modifier( No need to apply it), and make sure the direction of thickness goes outward and even thickness is checked.
3. CREATING INNER WALLS
Select Outer wall, duplicate a face, and separate it into a new object, name it Inner wall or IW.
Adjust the modifier settings and object height for variety within the model (optional).
From top view and transparency on, select the vertices and extrude them to create corners.
For visibility, you can select edges and mark them sharp.
NB! Make sure that corner combines only two faces, for the solidify modifier to work smoothly.
Duplicate faces in edit mode for additional walls.
Make sure the walls align properly, by using snap settings and limiting transforms to global or local axis.
Make sure the solidify modifier thickness direction is consistent, change face normals (Alt+N) if not.
4. ORGANIZING SCENE
Create a new collection and name it Floor_0 or something of similar nature.
Select basemap mesh, outer wall, floor mesh, and inner walls and add them to the collection by manually dragging them there in the outliner, or by pressing M in the active view.
Create a new collection and name it reference, add reference image into that collection.
5. MAKING DOORS AND OPENINGS
Select the object (Inner wall or outer wall) and in edit mode use loop cut (Ctrl+R) to divide polygon where necessary, and use edge slide or regular transforming to move it to the right place.
Delete the polygon from between said edges.
With solidify modifier active and not applied, the new door opening will not affect the thickness of wall.
6. STAIRS AND ELEVATORS
No limitations besides low poly count.
Easiest way to populate the scene with stairs, elevators and escalators in to finalize one and then duplicate it.
Therefore make sure that the model is to your liking, it has material applied and when using textures, make sure the object has UV’s.
Add a collection into the floor_0 master collection and name it accordingly (stairs, elevators, escalators).
Make sure the object is within the collection, then duplicate it in object mode, use reference to place them.
7. NEW FLOOR
In the outliner, right click on the floor_0 collection and duplicate it, rename the duplicate into Floor_1 and for clarity I recommend to rename other collection within that as well.
In the outliner right click on the duplicated collection and select hierarchy.
Move it up on the z- axis so that the new floor sits directly atop the lower floor. It can be done either by constraining movement on the z axis and using snap settings, or by constraining movement to z axis and inputting the height of the object „Outer wall“( if you do not remember it then select the outer wall on the floor_0, go to edit mode and for example select one of the upper horizontal edges. Press N and look for the global position of the z axis).
Toggle of the visibility of floor_0 collection in the outliner and select the reference plane, select its object data properties panel and change the reference image from floor_0 to floor_1, if you set up the folders properly than the image should be in the same place.
Make the necessary changes and rebuild what must be rebuilt.
For example cutting in the openings for stairs and escalators etc. If quad topology was maintained then loop cuts work well.
Repeat for other floors.
8. EXPORTING
If the scene is organized then everything should be in right collections.
In the outliner, right click on the floor master collection (floor_0, floor_1…) and select hierarchy.
With the selection active, go to „file“, „export“ and then choose FBX format.
Check the box on „Selected objects“ and change scale value to 0.1.
Create a new folder into the folder system, name it export and add the date of export into the name. Whenever changes are made, create a new folder for the exported files.
Name the file and repeat with other floors.
When its necessary to share the whole project, pack all external data into the blender file from „File“, „External Data“.
Then zip and send the master folder of the whole project.
9. CREATING UV’S WITH MATCHED SCALE
Select floor meshes from all floor collections and isolate them with Shft+H (Alt+H to make everything visible again).
With active selection go to edit mode and make sure all faces are selected.
Open up UV editor split view and in 3D viewport go to top view.
With the selection active, press U while in viewport and select „project from view“.
Select and scale the UV’s if necessary.
In case textures need to be custom made in a another software, select one floor mesh, go to edit mode and select the faces in UV editor and export out the UV layout, it can be used for precise texturing. Repeat with other floors.
10. CLEANUP
Add a large cube to the scene and make sure it is in the overall scene collection, not in one of the floor collections.
Make sure all collections and objects are visible.
Select the cube and assign one of the dud duplicate materials to it.
With the cube selected, press Shft+L and select material, that selects all all objects with that material on it, press Shft+H to isolate selection.
Now apply the correct material to the cube.
Select all the objects with the dud duplicate material and then add cube to the selection, press Ctrl+L and select material. The last object in selection determines the material.
Number of material channels and their order is of importance in that operation. If objects with dud duplicates have multiple material channels and Cube has only one, then it changes only the first channel of the objects, if the cube has two then it changes two channels in the same order. Therefore if every object has only one channel, then it works smoothly, but if there are multiple channels and the dud duplicates are not in the same order then it requires some further steps- But in this case it is easier to change the dud duplicates manually on each object, after the selection step (step 4 of this tutorial).
When the changes are made, delete the cube.
On the top ribbon of outliner, navigate to „Orphan data“ and then click Purge.
Now duplicates have been removed from the scene.
As always we are pleased to help you for creating a wayfinding solution for you or your customer. If you like us to make the maps, please also look our floorplan campaign and don’t hesitate to contact us.
3D Wayfinder R&D AS has successfully completed as many as 200 projects a round the world. Below map gives you just small glimpse where you can find our work.Find out how hospital wayfinding software works.
3D Wayfinder global projects
Opportunity to work with clients globally has been beneficial to us all. Making our team stronger in 3D wayfinding software development and helping our clients to conquer their challenges. From the knowledge we have gathered we have now good insight what direction wayfinder software can grow in future.
Today, we see rising demand for solutions in healthcare sector. Larger city hospitals have grown to huge building complexes and provide rooms for hundreds of patients at a time. Some medical services are provided in one building and other services in different building. Patients who are staying short time and patients from rural areas are the first ones to discover these difficulties. Finding right cabinet from that maze can be long and challenging event.
How are we going to improve healthcare through wayfinding?
For hospitals we have taken already steps to improve our 3D wayfinder software. “3D Hospital Wayfinder and Management System” has been supported by Estonian-Norway joint-programme Norway Grants “Green ICT programme”. Project timeline is August 2020 till July 2023. Project’s focus is on developing web-based software service for healthcare operations, example hospitals. Like facility’s floor-plan visualization in 3D with universal API for collecting different real-time data and showing it in 3D floor-plans.
Our project in Poland is a great example how large hospitals can really be. As you can see below picture it is not an easy task to find right location there. The use of the stairs is not possible for a person in a wheelchair. To tackle this issue we have created opportunity to use multiple direction routes.
We can’t forget that there are people who do not want to touch kiosks for health reasons or are located in different part of hospital, where there is no self-service kiosks. To tackle this issue we have created QR code based wayfinder solution. Scan QR code with your smartphone and use your device like kiosk. All the functions you get from large self-service kiosk you get in your smart device.
If you have more questions about the software we are happy to talk!
Harbour placed shopping mall Nautica has got a new name and a new look. After rebuilding the shopping mall, two wayfinding kiosks were also placed. Although the mall is not large, the wayfinding feature is really important for them.
Nautica mall in Tallinn, Estonia reopened in the end of 2017. It has only about 60 shops but wayfinding kiosks are more important than ever after the renovations. Old shops are in new places, new shops have been advertised but neither the old or new clients know where to find them.
In Nautica things are made even more difficult. Because a new floor was added and most of the restaurants, ATM-s and bathrooms are placed there.
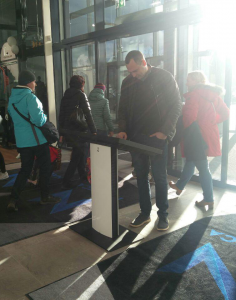
Kiosks in Nautica are simple and practical. They don’t take a lots of room and their slanted design indicates immediately that the screen. Even though it might have an advertisement as a screensaver – is meant for customers to use.
Kiosks are conveniently placed by the doors of the two main entrances. These are the first things that every customer sees when they enter. Placement like this makes it easy for visitors to notice. They don’t need to start looking for maps or signs when they are not sure where they should go.
It is also practical because it’s more likely for the visitor to take notice of the kiosk right after entering than in the middle of the busy mall. So when they need to use it later, it’s easier for them to remember where to find it.
The design for the new template was provided by the mall. We only needed to bring it into reality. They wanted a stylish and simple look with clear and easy to use interface. They also wanted to have all the shop names displayed on default screensaver, slowly rolling by on the screen. This animation with shop logos also works on map view. If the customer hasn’t touched the screen for a little while.
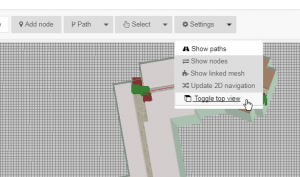
Sometimes it’s the small things that make all the difference. New “Toggle top view” feature in 3D Wayfinders administration panels editor is a useful tool that will give needed help to our users.
Toggle top view shows all the maps straight from the top and it works with both 2D and 3D maps. While this feature is selected, the rotation is disabled. This is most useful when marking paths on the map. It could also be used if you want to set kiosk view straight from the top on 3D maps.
“Toggle top view” can be found on the top of the editor under “Settings“.
We have finished installation of approximately 250 iBeacons for mobile app positioning. Although the installation process is easy. There are some tricks and common practises to follow, when setting up iBeacon based indoor positioning.
iBeacons installation
iBeacons are cost effective indoor positioning devices, that are really easy to install. As each iBeacon has it’s own battery, that can last about a year, then there is no need for external power supply. Devices are very light, so it is possible to mount them by using double-sided tape.
Even though the installation of one iBeacon is a simple matter. Overall installation process can be quite long and somewhat physically exhausting due to the constant climbing up and down the ladder/platform.
At first glance it might seem that the device will disrupt the look of the building. But, as we can see from the image below, if you take into consideration the overall theme and look of the building during choosing of the device, it merges into the plethora of different sensors and equipment covering the ceiling.
Before installing devices. It is important to mark down the specifications for each iBeacon device. Each iBeacon has it’s parameters: unique ID, name and range.
It is also a good practice to mark the iBeacons. So that you know you’re installing the correct device to the correct location. For this we used a label printer.
Plan before iBeacons installing
It is good to have a plan before physical installation. We used the map of the building to first draw a layout of the placement of the devices and their coverage area. It is a common practice to have a minimum of 3 iBeacons covering any part of the mappable area for the navigation to work efficiently.
Configuring iBeacons in 3D Wayfinder is also easy. Just create a node with type “iBeacon” and enter iBeacon parameters (UUID, Name etc.). To manage all the devices from one place, open “Beacons” from the left-side menu. You can do this prior to the actual installation when you are confident that your layout will work.
It is highly recommended to install the iBeacons to a height unreachable for the visitors of the building, so no one could easily snatch them. We installed the devices onto the ceiling. For this we used a painters platform that had wheels on them so it is easy to move it around the building. We recommend setting the platform to a height so the person installing the devices could stand up straight and then reach the ceiling without having to stretch too much.
Good time to install iBeacons in a shopping mall is when there are not that many people.
In recent days, we were having problems with 3D model converter. These problems are partially fixed now, so converting non-corrupted 3D files shouldn’t cause any interruption anymore.
3D Wayfinder’s model file converter has stopped quite often lately, when converting corrupted 3D floor-plan files. Every time converter stopped, we had to start the process manually and clean the converting queue.
All 3D files are converted to JSON format, so they can be load in 3D Wayfinder. Our converter supports many 3D file formats, most common are FBX and DAE.
The problems were with couple of models, that caused invalid JSON when converting.
We have added error catching for this, so the rest of the converting process can resume and these corrupted models don’t interrupt other 3D models to be converted.
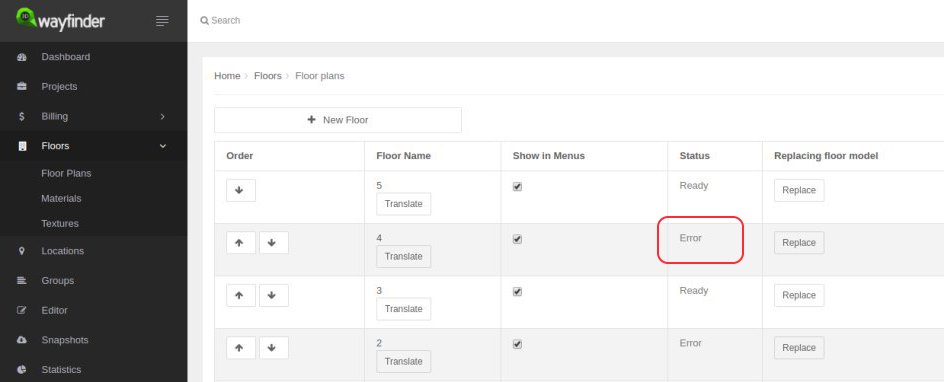
If converting of 3D floorplan model fails, you’ll get “ERROR” response in 3D Wayfinder Administration:
Other reasons, that 3D files couldn’t be converted are mainly caused by using non-UTF characters in mesh names.
This website uses cookies to improve your experience. We'll assume you're ok with this, but you can opt-out if you wish. Cookie settingsACCEPT
Privacy & Cookies Policy
Privacy Overview
This website uses cookies to improve your experience while you navigate through the website. Out of these cookies, the cookies that are categorized as necessary are stored on your browser as they are essential for the working of basic functionalities of the website. We also use third-party cookies that help us analyze and understand how you use this website. These cookies will be stored in your browser only with your consent. You also have the option to opt-out of these cookies. But opting out of some of these cookies may have an effect on your browsing experience.
Necessary cookies are absolutely essential for the website to function properly. This category only includes cookies that ensures basic functionalities and security features of the website. These cookies do not store any personal information.
Any cookies that may not be particularly necessary for the website to function and is used specifically to collect user personal data via analytics, ads, other embedded contents are termed as non-necessary cookies. It is mandatory to procure user consent prior to running these cookies on your website.